
Welcome to WordPress. This is your first post. Edit or delete it, then start writing!
Easy Savory Oatmeal – For Breakfast, Lunch or Dinner!

English version below!
Einfacher, herzhafter Haferbrei aka. Savory Oatmeal
Haferbrei, Porridge, Oatmeal, es hat viele Namen und ich esse es sehr gerne zum Frühstück. Mein übliches Frühstücks-Rezept ist einfach Haferflocken, Wasser und/oder Mandelmilch und Banane. Aufgepeppt wird es dann noch durch Zimt, Nüssen, andere Früchte wie zum Beispiel Beeren… Endlose Variationen… Mein Freund ist nicht so überzeugt, oder hat sich mal ein Oatmeal-Trauma angefressen. Er sieht das eher als Camping-Essen, was man isst wenn man was warmes will, aber nur einen Campingkocher hat.
Außerdem sucht er schon nach Ewigkeiten nach einfachen Camping Frühstücks-Rezepten, die nicht süß aber warm sind. Auf der Suche nach Rezepten bin ich auf „Savory Oatmeal“, also herzhafter Haferbrei, gestoßen und hab es sofort ausprobiert. Zuerst mit ganz normalen Haferflocken und einfach Salz, Kräuter, Zwiebel und Knoblauch. Großartig! Die Konsistenz fand ich aber noch nicht perfekt, ich hab mir etwas mehr Biss gewünscht. „Steelcut Oats“ waren die Antwort auf das Problem. Die Art der Haferflocken wird auch „Irish“ oder „Scottish Oats“ genannt oder in Deutschland als „Haferschrot“ zu finden.
Diese Art von Rezept ist super, um verschiedenstes Gemüse aufzubrauchen das im Kühlschrank rumliegt und sonst schlecht werden würde, super Resteverwertung!! Also ich werde mal das Gemüse aufschreiben, was ich verwendet habe, aber fühlt euch nicht gezwungen genau die Zutaten herzunehmen. Ach ja, wenn ihr keine geschroteten Haferkörner finden könnt: Normale Haferflocken funktionieren, aber die Konsistenz ist einfach weicher und breiiger! Und… um es noch ein wenig aufzupimpen und es als Abendessen durchgehen lassen zu können, habe ich am Schluss noch Trüffelöl darüber geträufelt. Sehr optional aber ich empfehle es wärmstens! Andere Zutaten, die ich mir gut darin vorstellen könnte sind Avocado, Bohnen oder Linsen, Pilze, Fenchel,… endlose Variationen sowohl süß als auch salzig, als Frühstück, Mittagessen oder Abendessen.
Nun zum Rezept…
Du brauchst:
1 Tasse Haferschrot oder kernige Haferflocken
3-4 Tassen Gemüsebrühe (bei den kernigen Haferflocken reichen 2-3 Tassen)
2-4 Tassen kleingeschnittenes Gemüse deiner Wahl; z.B. Zwiebel, Knoblauch, Karotten, Aubergine, Brokkoli, Sellerie, Spinat
Salz, Peffer nach Geschmack
1 EL gehackte Kräuter; z.B. Thymian, Rosmarin
1-2 EL Hefeflocken (gibt mehr Geschmack! Für Nicht-Veganer auch eine Option: Parmesan!)
etwas Trüffelöl
Bereite zunächst dein Gemüse vor. Wasche und schneide es relativ klein, damit es dann in der Pfanne nicht so lange braucht, bis es weich ist. Brate zunächst Zwiebeln und Knoblauch in einer Pfanne an und gib anschließend das Gemüse hinein das etwas länger braucht (z.B. Karotten, Sellerie und Auberginen). Nun kannst du den Haferschrot oder Haferflocken in das Gemüse einrühren und mit der Brühe aufgießen. Gib die Flüssigkeit nach und nach hinzu, wie bei einem Risotto, je nach Bedarf und rühre ab und zu um. Die kernigen Haferflocken dauern ca 10 Minuten, der Haferschrot 15-20 Minuten. 5 Minuten vor dem Ende der Kochzeit kannst du nun das restliche Gemüse, das nicht so lange Dauert (z.B. Spinat) und die Kräuter hinzufügen. Mit Salz, Pfeffer abschmecken, Hefeflocken hinzugeben, in Schüsseln servieren und das Trüffelöl darüber träufeln.
Ich kann euch gar nicht sagen wie gut es geschmeckt hat. Einfaches und schnelles Comfort Food! Ich hoffe euch hat das Rezept gefallen und ihr lasst mir einen Kommentar da! Welches Gemüse oder welche Zutaten hast du verwendet oder würdest du verwenden? Wenn ihr das Rezept ausprobiert habt würd ich mich über Bilder freuen! 🙂
Eure kleine Avocado,
Lisa
English version:
Easy Savory Oatmeal
Oatmeal or Porridge, whatever you want to call it. I love eating it for breakfast. Easy, fast and warm! My usual breakfast recipe is just oats, water and/or almond milk and a banana. I pimp it with a little cinnamon, nuts and other fruits like berries… endless variations. My boyfriend isn’t convinced or maybe he has just an oats-trauma from too much oats. He sees it as camping food. You eat it if you want something warm, but you just have a camping stove.
And he also asked for a simple recipe for camping thats not sweet but warm. So I looked for recipes and found „savory oatmeal“ or „savory porridge“ and tried it instantly. At first I used just normal rolled oats and added salt, herbs, onion and garlic. Great! But the consistency was not perfect yet! I wanted something to chew, more al dente. „Steel-cut Oats“ also known as „Irish“ or „Scottish oats“ were the answer!
This kind of recipe is great if you want to „clean out your fridge“ and get rid of all the random vegetables lying around and getting spoiled! I will write down what vegetables I used but feel free to use whatever you want and have on hand. Oh and, If you don’t have the steel-cut oats, normal rolled oats will do just fine, the consistency will be softer. And… if you want to bring it to the next level, and get away with calling it a dinner… drizzle some truffle oil over it. Optional but highly recommended! Other ingredients I think would work well with the Oatmeal: beans, lentils, mushrooms and fennel. Or even some sliced Avocado as a topping. Endless variations sweet as well as savory for breakfast, lunch or even dinner.
Now here is the recipe.
You need:
1 cup steel-cut oats
3-4 cups vegetable broth (for rolled oats: 2-3 cups)
2-4 cups diced or sliced veggies of your choice; I used onion, garlic, carrots, eggplant, broccoli, celery, spinach
salt and pepper to taste
1 Tbsp minced herbs; I used thyme and rosemary
1-2 Tbsp nutritional yeast (for the cheesy flavor, for non-vegans: parmesan works as well)
a drizzle of truffle oil
First prepare your veggies, wash and cut them in somewhat small pieces, so that it cooks faster in the pan. Cook your onions and garlic in a pan. Add the veggies with a longer cooking time (like carrots, celery or eggplant). Now add your Oats and stir in some of the broth. Add more broth from time to time when all the liquid is gone. Stir occasionally. The steel-cut oats take 15-20 minutes to cook, the rolled oats just 10 minutes. 5 minutes before everything is done add all the other veggies with a shorter cooking time, like spinach and other greens. Add the herbs, nutritional yeast, salt and pepper. Serve in bowls and drizzle with truffle oil.
I cannot say how good it is. Fast and easy comfort food. I hope you liked my recipe and I’m always happy about comments! What ingredients would you add to your savory oatmeal? If you tried the recipe I would love to see photos of your version!
your little avocado,
Lisa
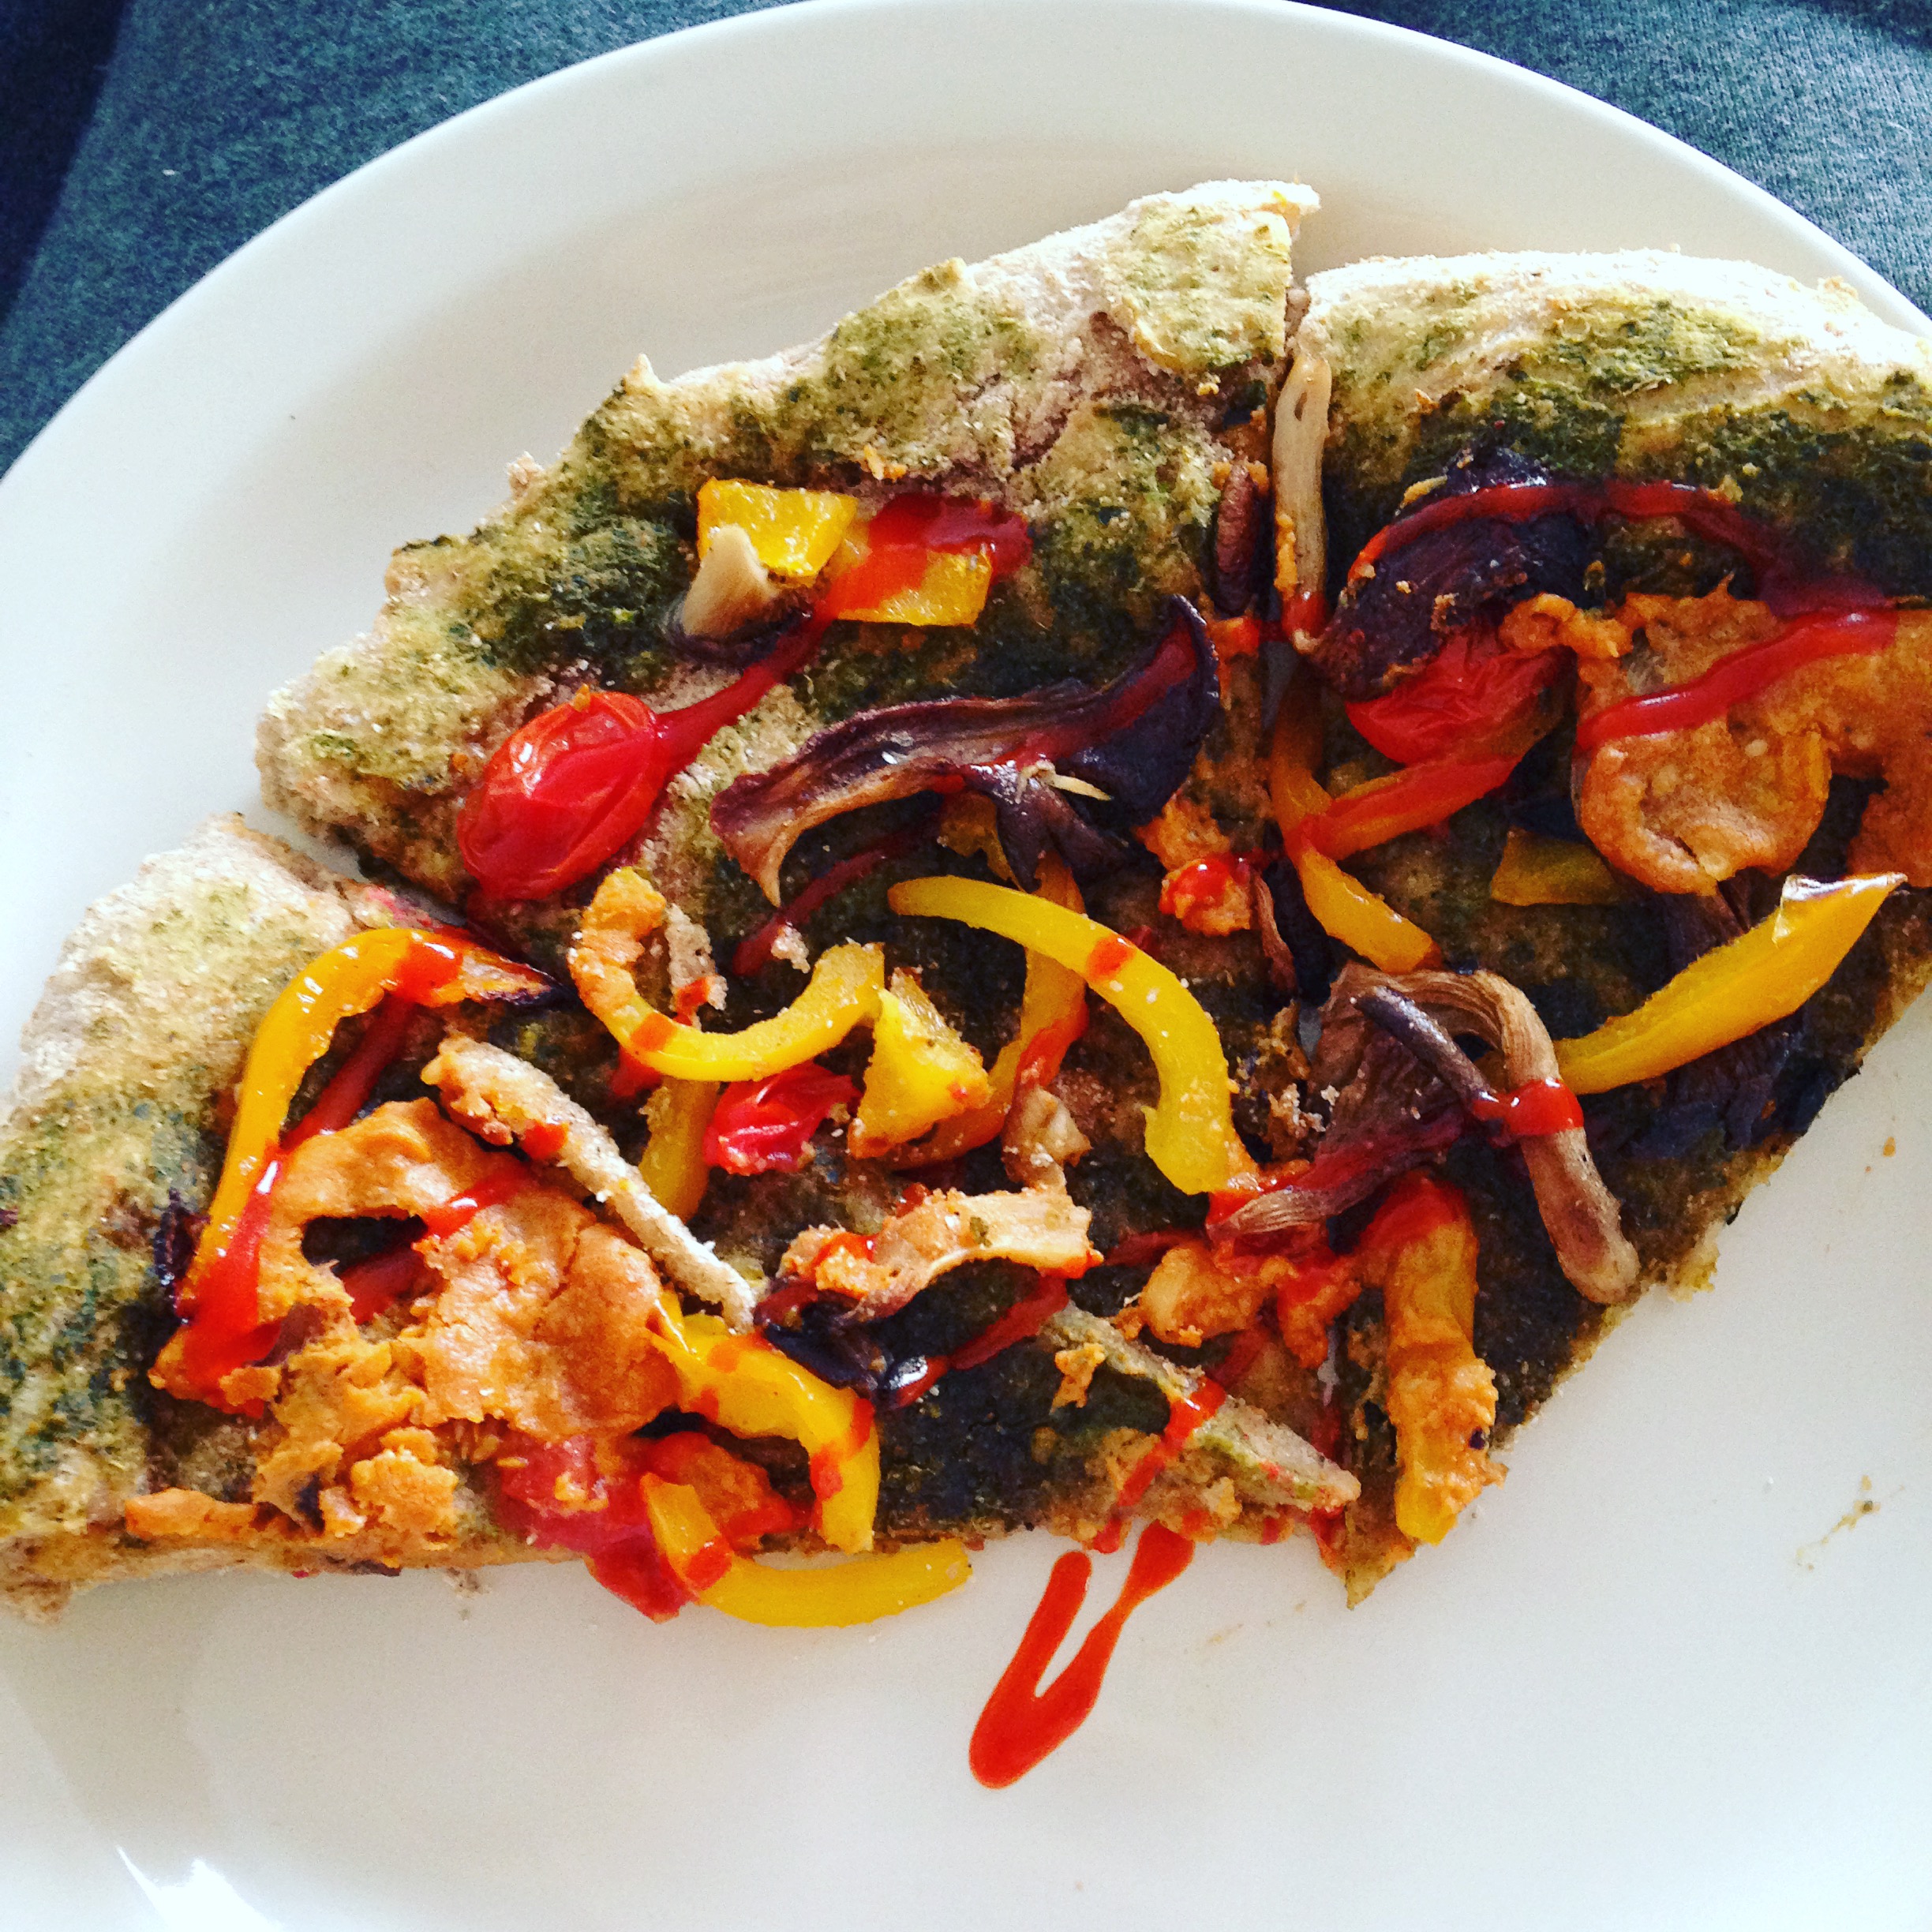
Asian-Inspired Pizza with Cilantro Pesto and Sriracha-Tahini-Sauce

english version below!
Asiatische Pizza mit Koriander Pesto, Austernpilze, Paprika und Sriracha-Tahini-Sauce
Hey ihr Lieben,
so jetzt lade ich endlich mein zweites Rezept hoch und es ist noch immer nichts mit Avocado und schon wieder etwas scharfes und wieder Mal Koriander… Sorry, aber es ist einfach lecker! Wie auch immer, ich LIEBE Koriander und ich LIEBE Sriracha!
Ich hatte Austernpilze Zuhause und ganz viel Paprika und habe überlegt was ich denn damit mache.Im Gefrierfach waren auch noch selbstgemachte Erdnuss-Koriander-Pesto-Würfel die endlich mal aufgegessen werden müssen und außerdem ist der aktuelle Sriracha-Hype auch nicht an mir spurlos vorüber gegangen.
Darum habe ich mir überlegt, eine asiatische Pizza zu machen. Mit einer Pesto-Basis und Austernpilze und Paprika als Topping und statt Käse gibt es eine Sriracha-Tahini-Sauce oben drauf! Da läuft mir schon beim schreiben wieder das Wasser im Mund zusammen.
Nun zum Rezept. Für den Pizzateig habe ich kein Rezept, den hab ich einfach nach Gefühl gemacht aber es gibt ja tausende Pizzateig Rezepte. Oder wenn man faul ist kauf man sich einfach einen fertigen, obwohl ich finde es lohnt sich, wenn man den Pizzateig selbst macht! Hier einige die ich gefunden habe:
Normaler Teig: http://www.chef-in-training.com/2014/04/perfect-pizza-dough-recipe/
Vollkorn-Teig: http://www.gimmesomeoven.com/whole-wheat-pizza-dough-recipe/
Glutenfreier (Quinoa) Teig: http://www.simplyquinoa.com/ultimate-quinoa-pizza-crust/
Rezept für 2 Personen (für zwei Pizzas)
Zutaten für die Pesto-Basis:
2 EL Erdnussbutter
1 Bund Koriander
1/2 Chilischote ohne Kerne
1 Knoblauchzehe
ein kleines Stück Ingwer (optional)
Salz
Pfeffer
etwas Wasser
Ich habe einfach alle Zutaten in den Mixer geworfen und püriert. Das Wasser hilft dass der Mixer es besser pürieren kann, und außerdem verdampft später auf der Pizza das Wasser ein bisschen und das Pesto würde sonst sehr trocken werden.
Ich habe das Pesto schon vor ein paar Wochen gemacht und einfach in Eiswürfelförmchen eingefroren und für das Rezept habe ich es dann einfach in der Mikrowelle mit ein bisschen Wasser aufgetaut.
Zutaten für den Gemüsebelag:
300 g Austernpilze
10 Kirschtomaten
1 gelbe Paprika
1 rote/orange Paprika
Pilze putzen und in Scheiben schneiden oder kleine Pilze ganz einfach nur halbieren. Kirschtomaten halbieren. Die Paprika in Streifen schneiden.
Zutaten für die Sriracha-Tahini-Sauce:
2 EL Tahini
Saft einer Zitrone
1 EL Sriracha (oder mehr, wenn man es schärfer haben möchte)
eine kleine Knoblauchzehe
4-6 EL Wasser
Salz und Pfeffer nach Geschmack
Alle Zutaten in einen Mixer geben und pürieren und mit Wasser nach belieben verdünnen bis eine dickflüssige Masse entsteht.
Nun gehts ans Pizza belegen, so gehts:
Den ausgerollten oder gekauften Pizzateig mit 4-6 EL Pestos bestreichen. Nun die hälfte des Gemüsebelags auf der Pizza verteilen. Als letztes die hälfte der Sriracha-Tahini-Sauce in Klecksen auf der Pizza verteilen. Genauso mit der zweiten Pizza weitermachen.
Backe deine Pizza bei 250 Grad Celsius ungefähr 8-12 Minuten. Guten Appetit!
Es war einfach so unglaublich lecker, ich hoffe ihr probiert es aus und lasst mir einen Kommentar da, wie es geschmeckt hat! Bis bald!
eure kleine Avocado, Lisa
English Version
Asian-Inspired Pizza with Cilantro Pesto, Oyster Mushrooms, Bell Pepper and a Sriracha-Tahini-Sauce
Hey,
Finally, here comes my second Recipe and there is still no Avocado in sight. And again its something spicy and again its with Cilantro… I see a pattern here… I just love cilantro and i really love Sriracha!
I had some oyster mushrooms and a lot of bell pepper at home, so I thought about what I can do with it. I also had some homemade pesto cubes in my freezer and I needed to use them at some point. And last but not least the Sriracha-hype got to me as well.
So… I created this asian-inspired pizza. Pesto base, the mushrooms and bell pepper as a topping and instead of cheese I made a Sriracha-tahini-sauce. My mouth is watering as I am typing this.
Let’s move on to the recipe. I decided not to post a pizza dough recipe, because I kinda eyeballed it and didn’t payed attention on the measurements. If your lazy, just buy a pizza crust. But I think it is always a thousand times better if you make your own dough. Here are some recipes I found:
„Normal“ dough: http://www.chef-in-training.com/2014/04/perfect-pizza-dough-recipe/
Whole wheat dough: http://www.gimmesomeoven.com/whole-wheat-pizza-dough-recipe/
Gluten-free dough (quinoa): http://www.simplyquinoa.com/ultimate-quinoa-pizza-crust/
Recipe for 2 People/2 Pizzas
Ingredients for the pesto-base:
2 Tbs peanutbutter
1 bunch cilantro
1/2 of a chili, seeds removed
1 clove of garlic
a small piece of ginger (optional)
salt+pepper
a little bit of water
Basically I dumped all the ingredients in the blender and blended it until smooth. The water helps you to get the blender going and later the water will evaporate when you back it and the pesto would be really dry. So try to get a more liquid consistency than you would normally have when making pesto.
I made the pesto a few weeks earlier and froze it in ice cube trays. For this recipe I just put it in a bowl and added some water and defrosted it in the microwave.
Ingredients for the toppings:
300 g oyster mushrooms
10 cherry tomatos
1 yellow bell pepper
1 red/orange bell pepper
Wash and cut your mushrooms in smaller pieces or leave smaller mushrooms whole. Half the cherry tomatoes. Cut your bell peppers into strips.
Ingredients for the sriracha-tahini-sauce:
2 Tbs tahini
Juice of 1 lemon
1 Tbs Sriracha (or more if you like it spicy)
a small clove of garlic
4-6 Tbs water
salt and pepper to taste
Once again, dump all your ingredients into the blender and blend until smooth. Thin out until you have a thick but liquid consistency.
Assembly:
Roll out the dough or take your bought pizza crust and spread 4-6 Tbs of the pesto on it. Take half of your vegetable toppings and spread evenly. The last thing left to do is to top it with a few dollops of your Sriracha-tahini-sauce. Do the same with the second pizza.
Bake for 8-12 Minutes at 250 degrees Celsius/480 degrees Fahrenheit. Enjoy!
It was so incredible delicious. I hope you will try it and leave me a comment. See you soon!
Your little Avocado,
Lisa
Washi Tape DIY – Wall Art – Mountain Skyline

English version below!
Wanddekoration – DIY mit Tape
Hi ihr Lieben,
Lange nicht gesehen… Ich muss wirklich anfangen regelmäßiger zu schreiben! Ich arbeite daran, ich versprech’s!
Nach zweimonatiger Wartezeit sind wir nun endlich in unser neues Apartment in Edmonton eingezogen. Das warten hat sich allerdings gelohnt. Schau dir die Aussicht an! Okay, das ist jetzt vom Dach (20. Stock), aber die Aussicht aus dem 14. Stockwerk ist auch nicht schlecht.

Bevor wir überhaupt in die Wohnung eingezogen sind, hat mir mein Freund offenbart dass ich für die Seele der Wohnung zuständig bin, sprich, dekorieren. Nach vielen Stunden Pinterest und mehrere Blogs später hab ich beschlossen wir machen etwas mit Washitape, auch Maskingtape genannt, für die die davon noch nie etwas gehört haben, können hier nachlesen was es genau ist. Wenn man auf Pinterest „washi“ „wall“ und „art“ eingibt kommen auch schon viele viele Vorschläge, was man mit seinen Wänden und Tape alles anstellen kann.
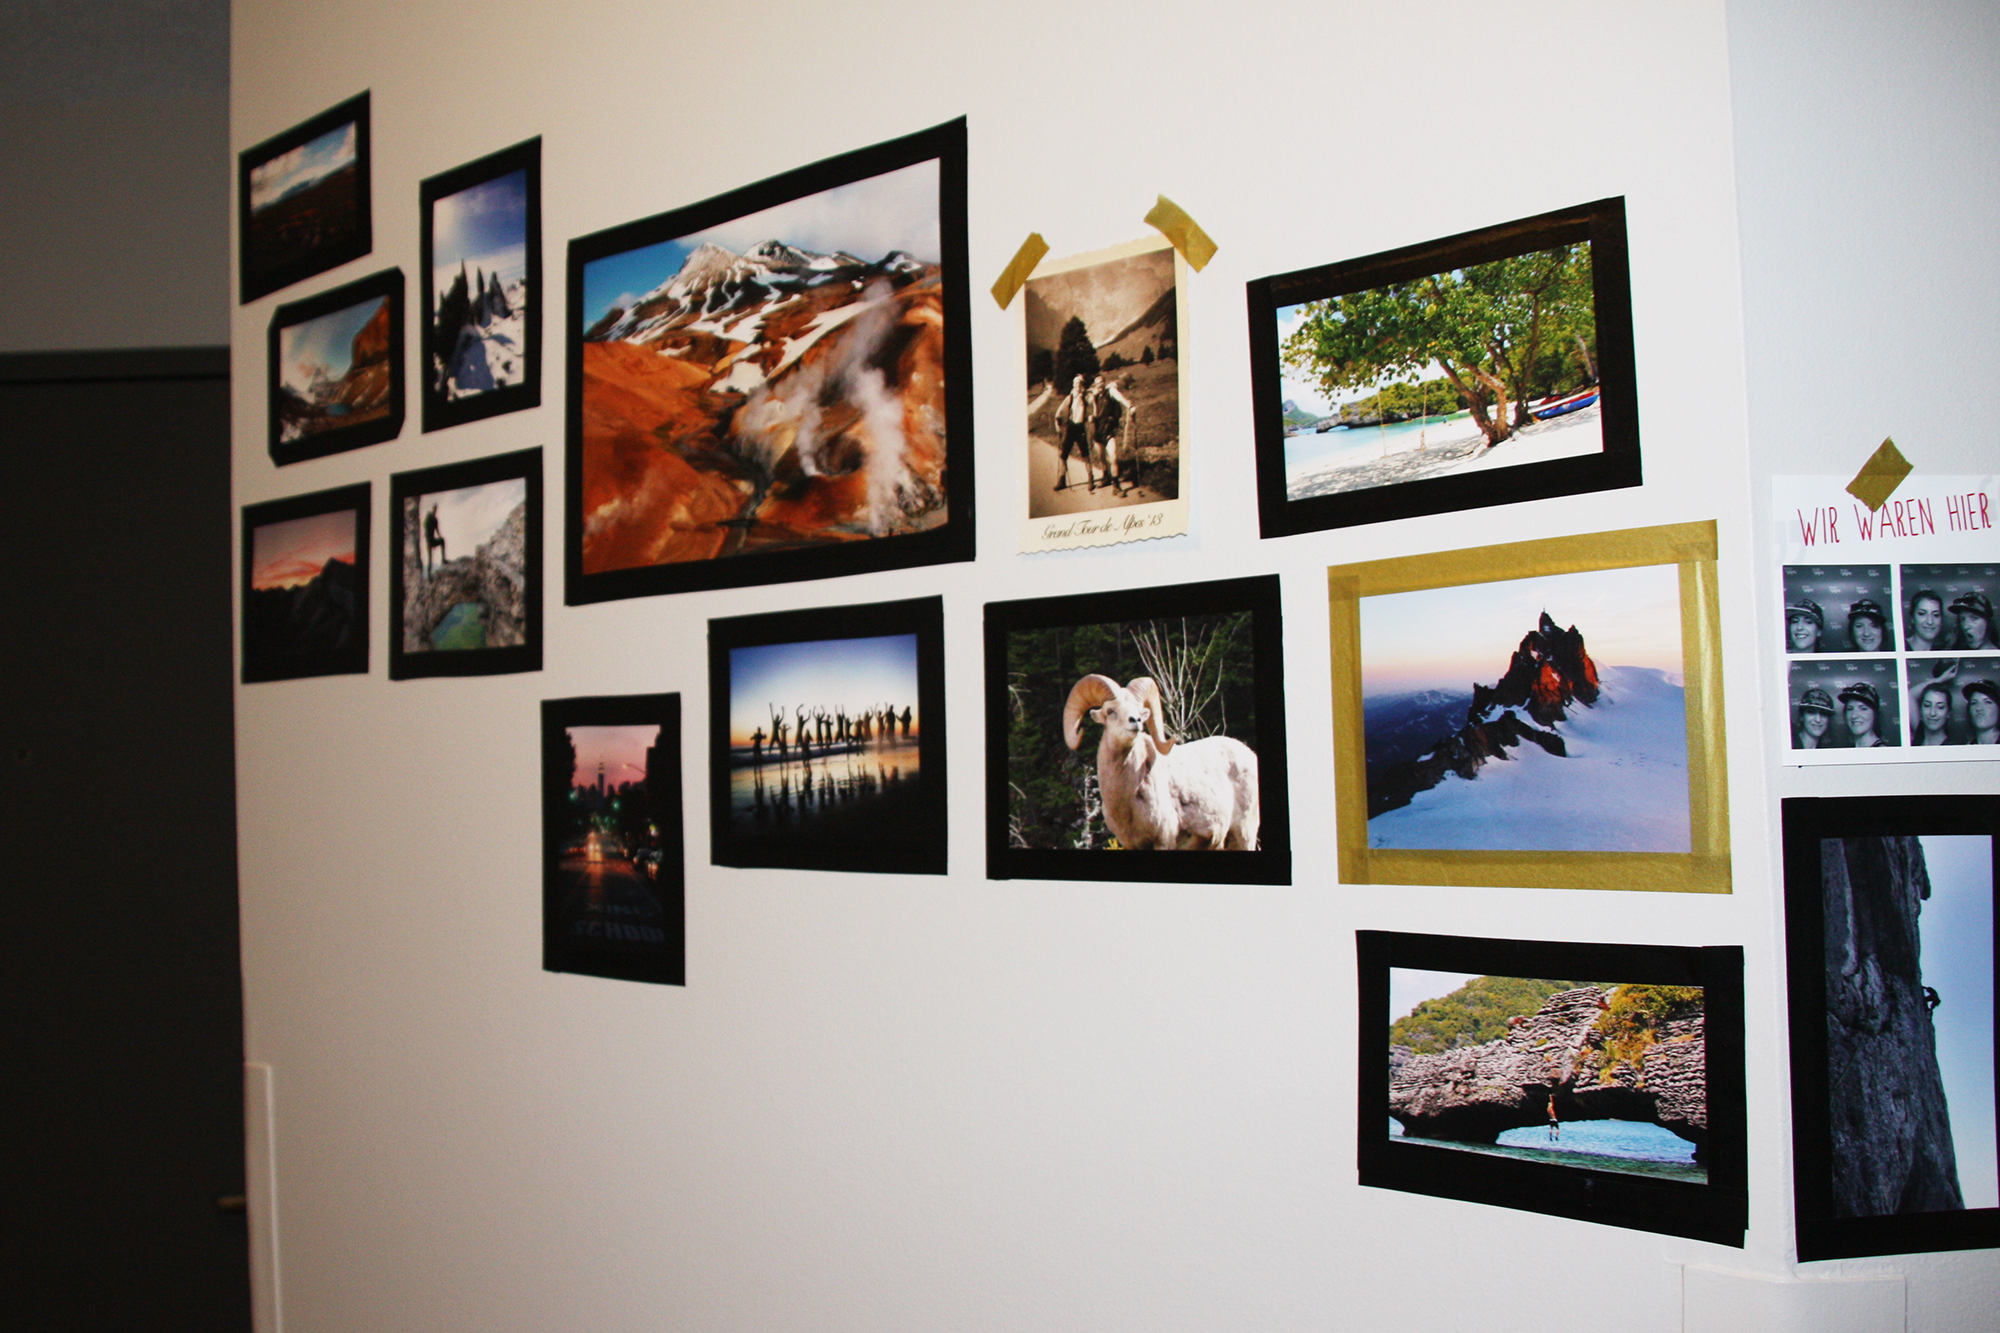
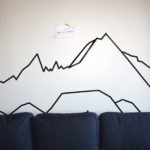
Dann ging es nur noch um die Frage was machen wir. Es gibt tausende Möglichkeiten. Da mein Freund ein totaler Bergfanatiker ist und ich auch schon dazu mutiert bin UND wir natürlich auch ein Stück Heimat in der Wohnung haben wollten, haben wir uns für einen Berg als Motiv entschieden. Wir haben uns für den Watzmann entschieden. Toller Berg, anstrengender Berg. Ich war da schon am Gipfel oben! Hier schon mal ein eine kleine Vorschau wie das ganze am Ende aussieht:
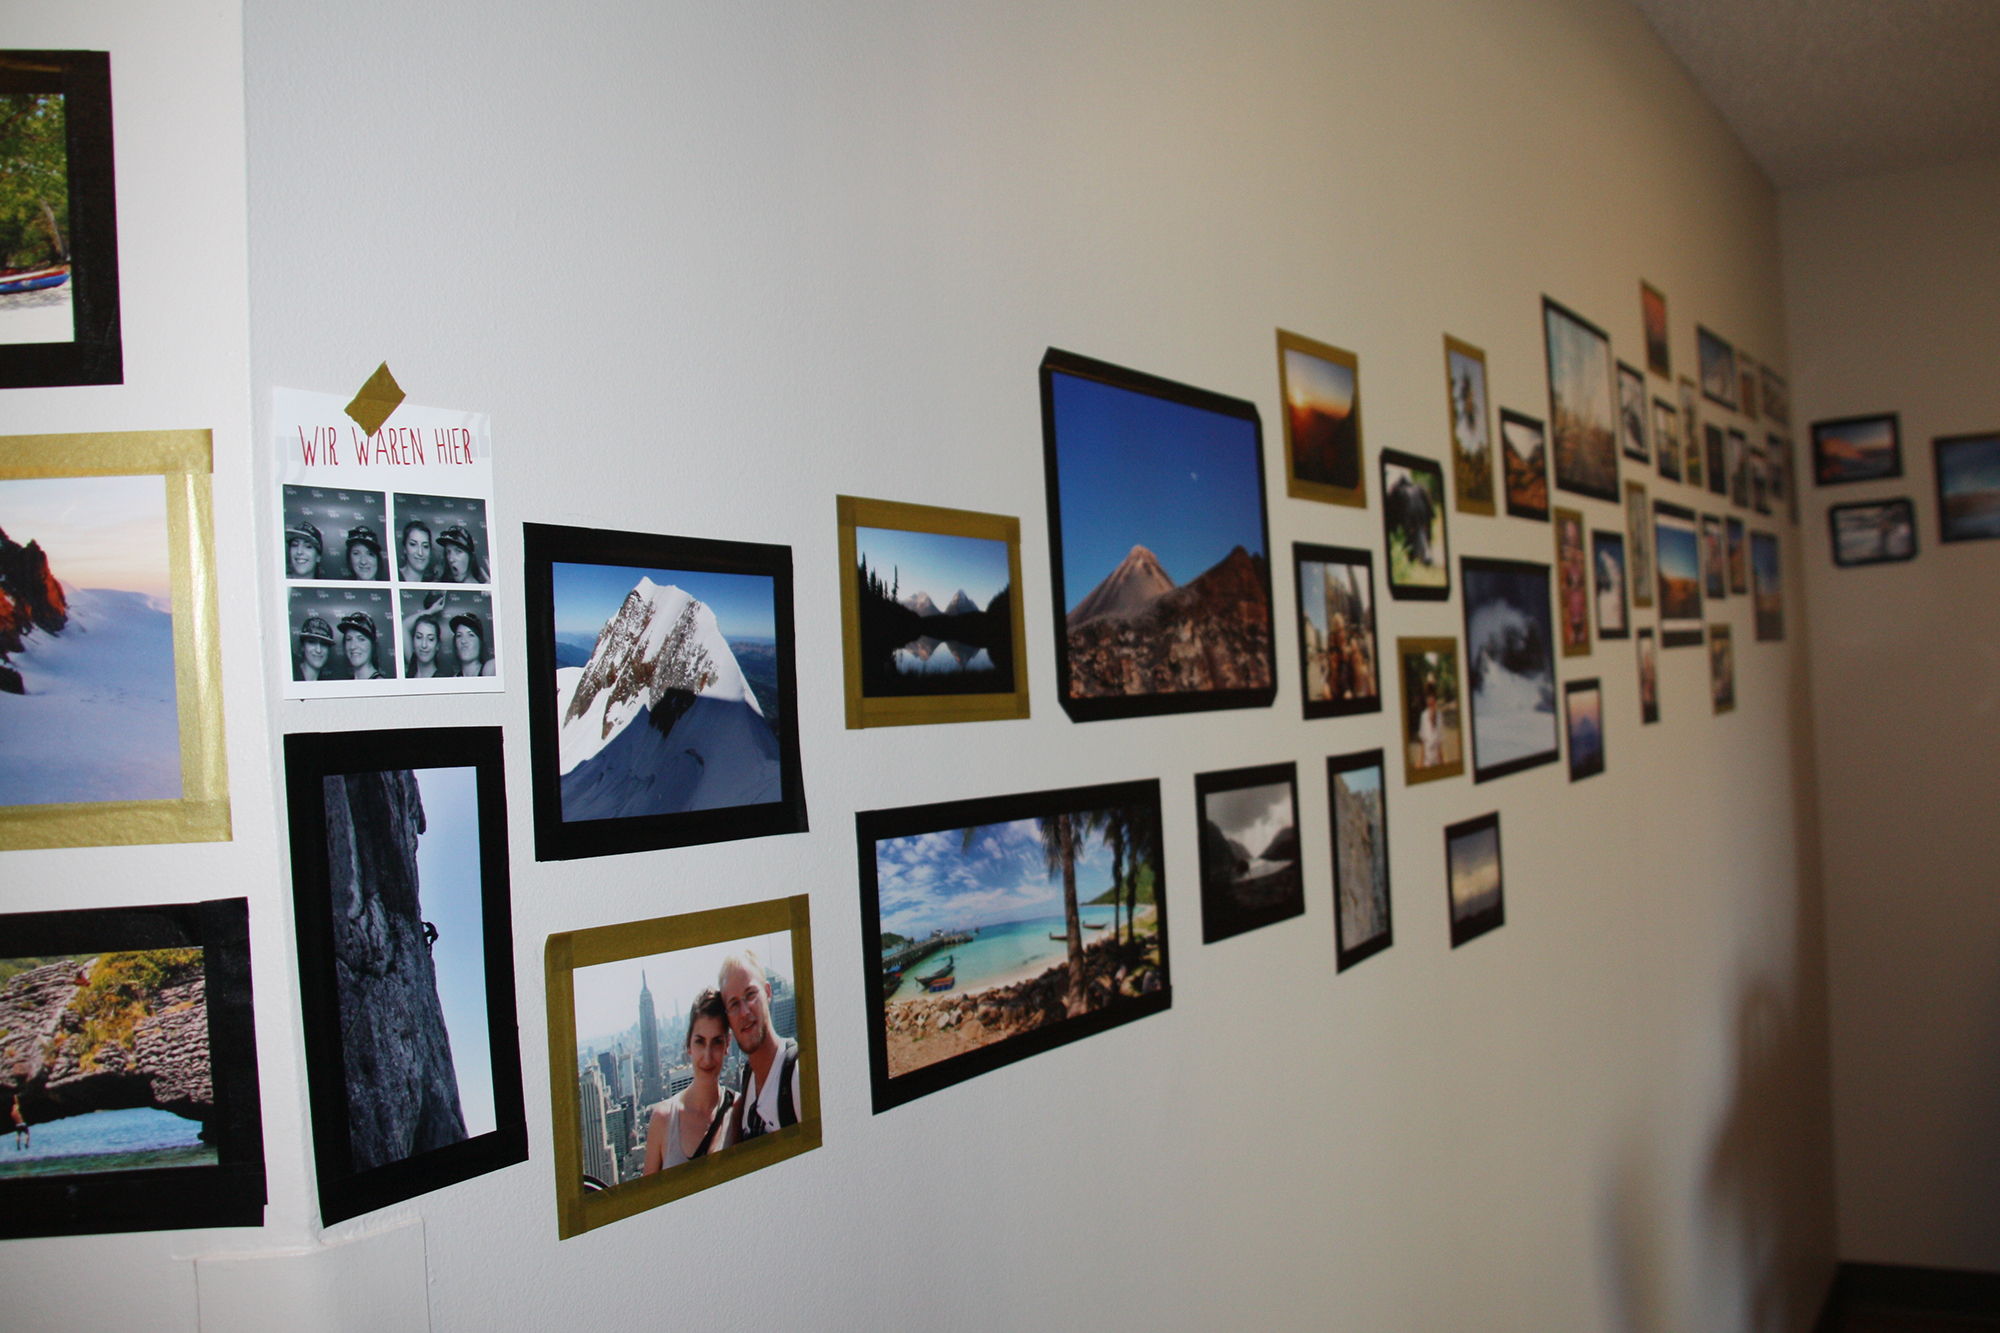
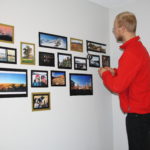
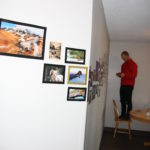
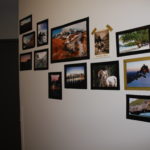
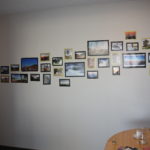
Dann haben wir uns noch dazu entschlossen, dass wir eine Fotogallerie an einer Wand haben wollen. Da wir ganz viele Fotos wollten und nicht so viele Rahmen kaufen wollten, aber dennoch den gerahmten Look haben wollten, haben wir kurzer Hand auch die Bilder mit Tape aufgehängt.
Außerdem haben wir zum „üben“ auch noch eine kleine Wand mit abstrakteren Formen gemacht. Dreiecke in Gold und Schwarz.
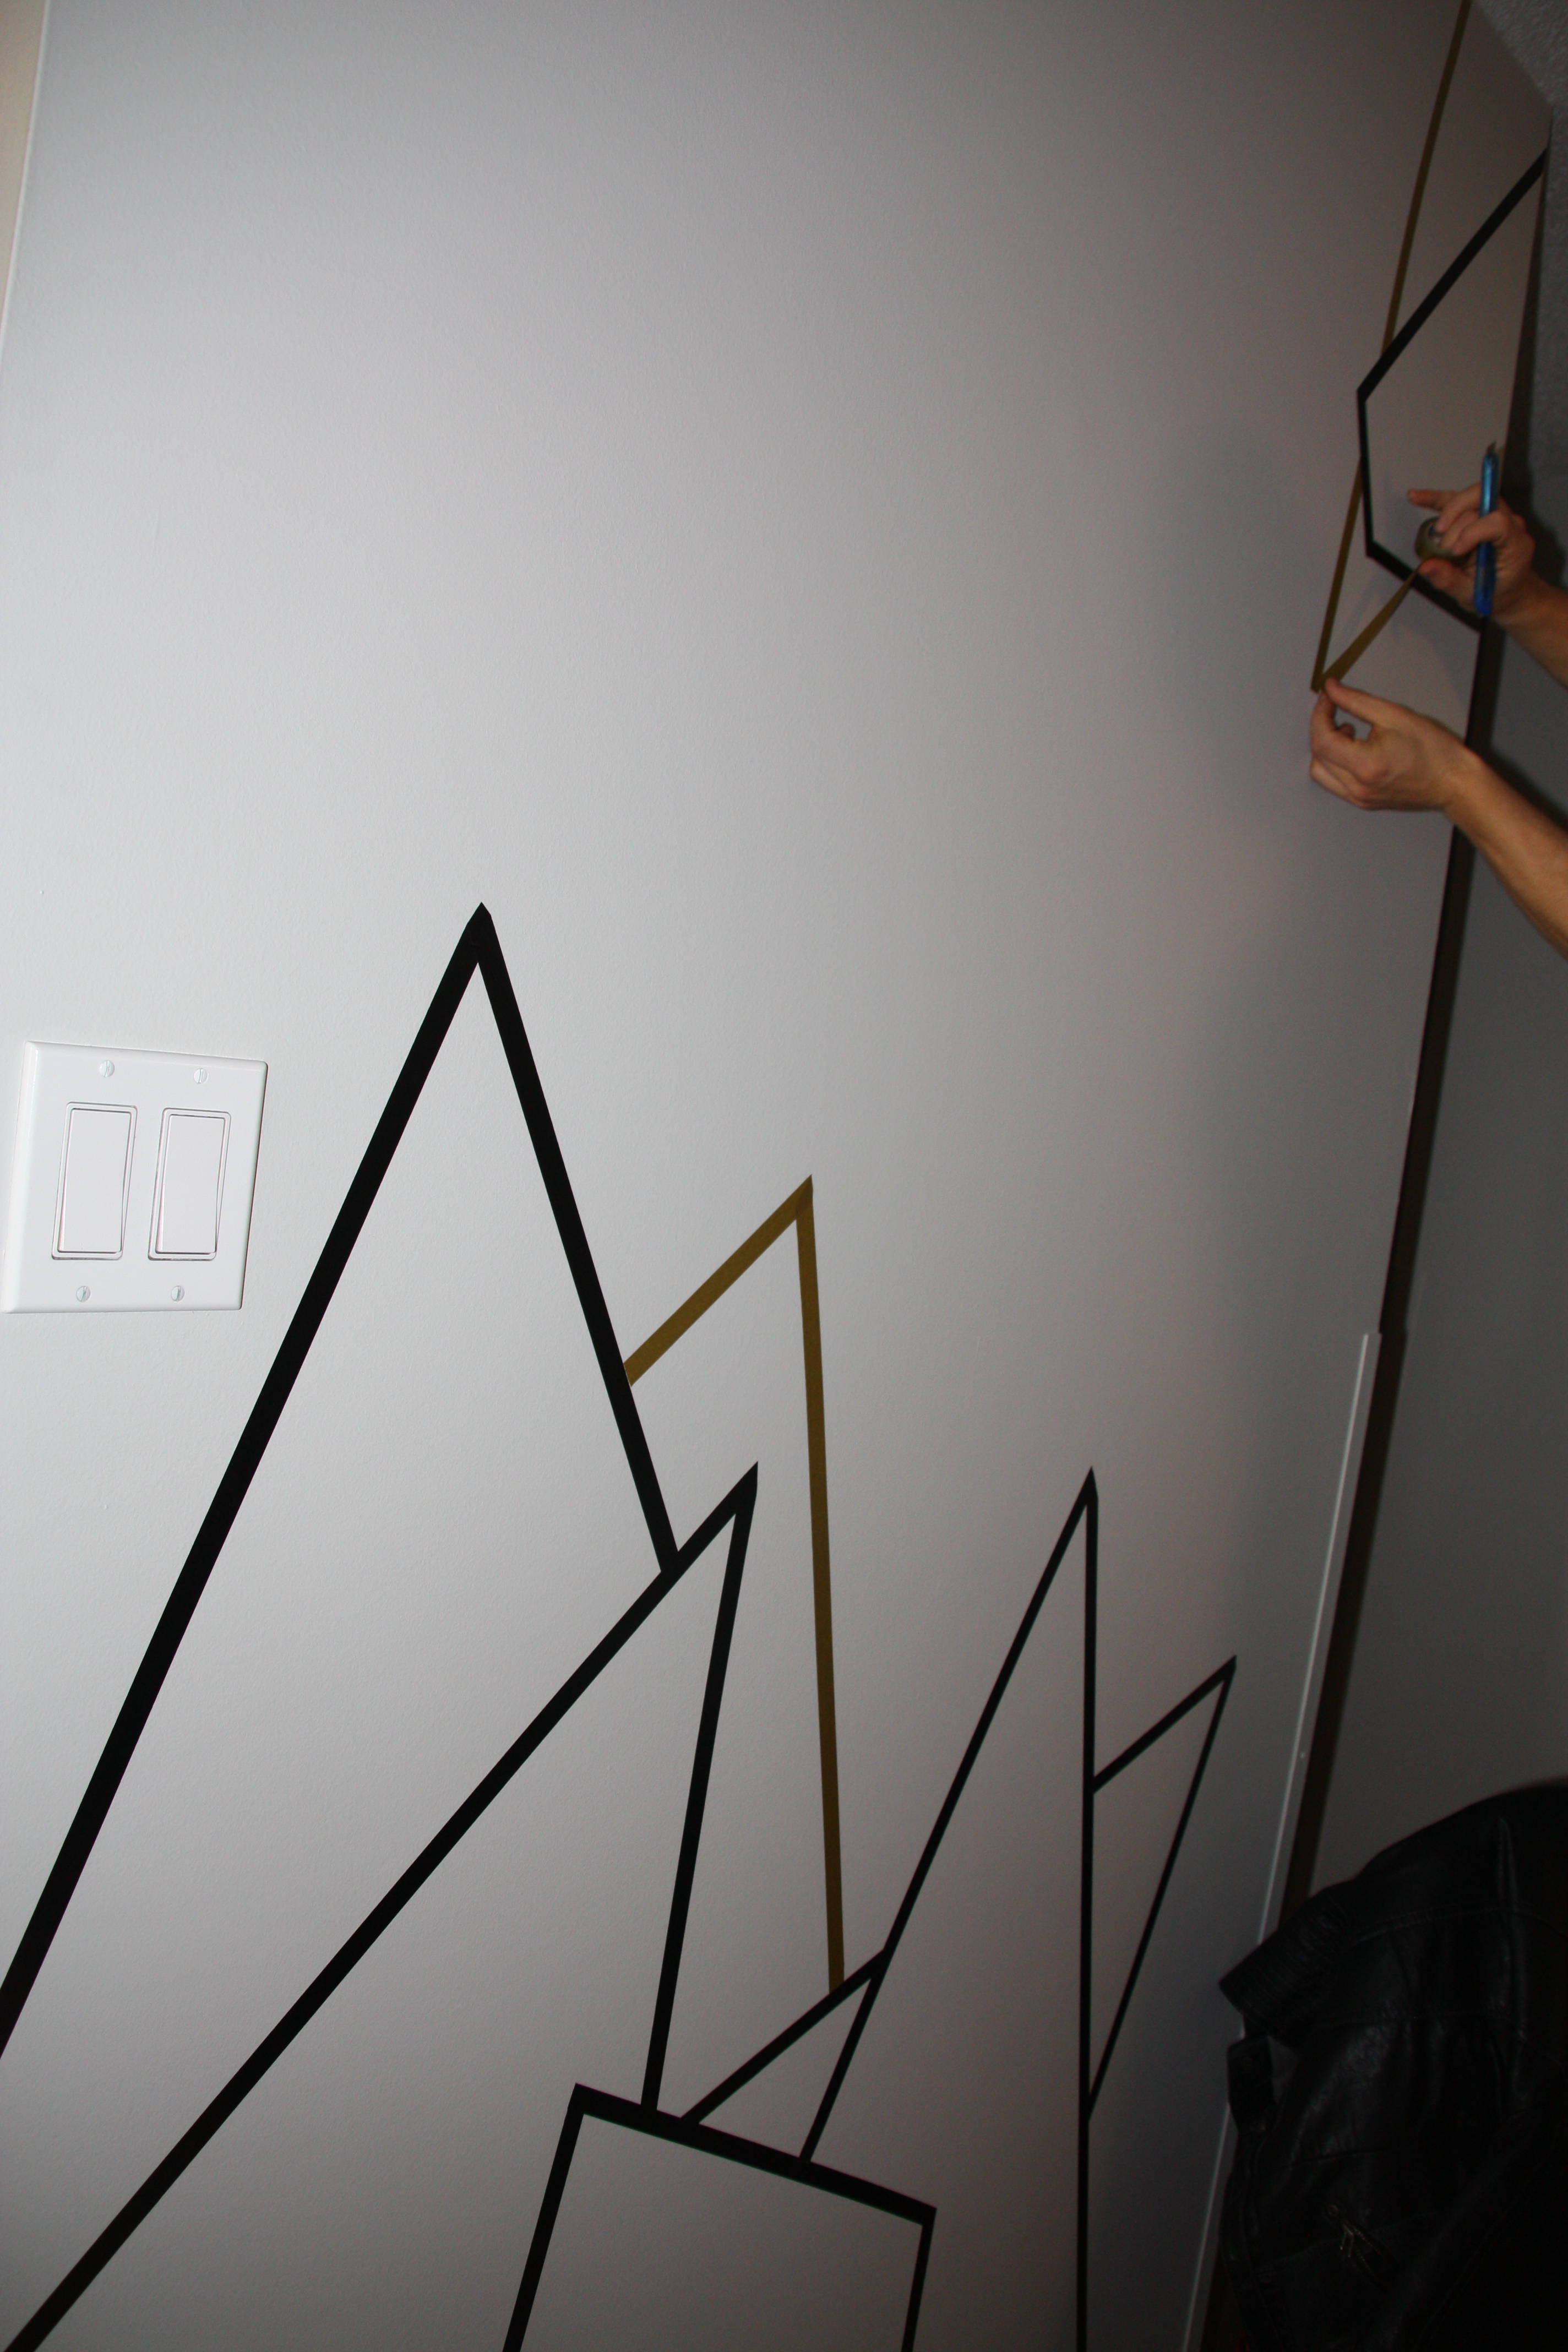
Fangen wir mal damit an. Im Prinzip haben wir uns eine schmale Wand dazu ausgesucht und haben ganz „wild“ Drei- und Vierecke verteilt.
Abstrakte Formen
Du brauchst:
Schwarzes Maskingtape
Goldfarbenes Maskingtape
Cutter oder eine Schere
Anleitung:
Bei abstrakten Formen legst du einfach los, indem du das Tape von der Rolle abrollst und an die Wand anbringst und in der gewünschten Länge abschneidest. Ich habe die Enden immer etwas überlappen lassen, und danach mit dem Cutter so abgeschnitten, dass es genau abschließt.


Bilderrahmen
Du brauchst:
Fotoabzüge (z.B. kannst du dir deine Fotos in einer DM Filiale ausdrucken oder im Internet bestellen z.B. bei Cewe oder Photobox)
Maskingtape
Cutter
doppelseitiges Klebeband
Anleitung:
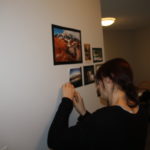
Überlege dir vorher ungefähr wie du die Bilder anordnen willst. Bringe dann doppelseitiges Klebeband (nur kleine Stückchen, das machst du nur, damit du es später einfacher hast das Maskingtape anzubringen) auf der Rückseite des Bildes an und klebe es an die Wand. Bringe dann rundherum, als Rahmen, das Tape an. Du kannst das in unterschiedlichen Farben machen, oder auch die Form des Rahmens variieren, oder einfach alle gleich aussehen lassen, ganz nach deinem Geschmack.
Wir haben goldene und schwarze Rahmen gemacht und ab und zu haben wir die Ecken abgeschnitten.

Bergsilhouette
Du brauchst:
Schwarzes Maskingtape
Goldfarbenes Maskingtape
Cutter
dünnes Papier/ Pauspapier
Bleistift
Lineal
Maßband
Anleitung:
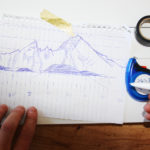
Zu aller erst haben wir uns ein Bild vom Watzmann rausgesucht, auf dem der Blickwinkel zu sehen war, den wir haben wollten und auf dem die Silhouette klar zu erkennen war. Ich habe die Umrisse einfach am Bildschirm abgepaust (dünnes Papier oder Pauspapier funktioniert am besten. Ich habe einfach eine Seite aus einem Collegeblock rausgetrennt), damit ich die exakten Proportionen übertragen kann.
Wir haben die Wand ausgemessen, wo wir das Kunstwerk platzieren wollten. Danach haben dann einfach ein Zentimeter-Raster über das abgepauste Bild gezeichnet und dann schon die proportional vergrößerten Zentimeter-Angaben auf das Blatt geschrieben. Das selbe Raster haben wir auch an der Wand im skalierten Maßstab ausgemessen und mit Tape die wichtigen Punkte markiert. Wenn es kein spezieller Berg ist, müsst ihr das natürlich nicht machen, dann könnt ihr das mit dem Raster natürlich überspringen. Aber eine Skizze von dem gewünschten Motiv macht trotzdem manchmal Sinn.
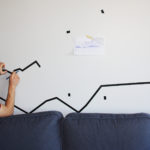
Dann ging es auch schon zur Sache und wir haben wild losgetaped. Mit dem Zollstock/Maßband bewaffnet haben wir immer wieder von den Markierungen aus gemessen, um die Proportionen genau zu treffen. Es ist wichtig, dass man immer wieder auf der Skizze schaut, wie hoch die Zacken sein müssen. Zuerst haben wir den groben Umriss getaped und dann später haben wir die Details eingebracht und die Dicke des Tapes an einigen Stellen variiert, um ein weicheres Gesamtbild zu erhalten. Zum Schluss haben wir noch ein Gipfelkreuz angebracht, das is natürlich total optional… Aber für mich gehört das einfach dazu!


Viel Spaß mit dem DIY! Wenn ihr eure Wände auch mit Tape verschönert, wäre ich super glücklich wenn ihr mir eure Kunstwerke zeigen würdet!
Liebe Grüße,
Eure kleine Avocado, Lisa
English version:
Wall Art DIY using Washitape
Hey all!
Long time no see. I really have to start posting regularly! I am working on it, I promise!
Finally, after two months of waiting we moved into our new Apartment in Edmonton … But all the waiting was worth it. Just look at that view!
Before we even moved in our apartment, my boyfriend put me in charge of giving the rooms a soul, means I am in charge of the decoration. After spending a lot of hours on Pinterest and many Blogs, I decided we go for something with Washi tape, or also known as masking tape. For all of you, who never heard of it before, you can look it up here. And when you type in „washi wall art“ on Pinterest, you get tons of search results, what you can do with your wall and tape.
So, now with a thousand possibilities we only had to choose the subject, what we wanted to put on our wall. Because my boyfriend is a huge mountain/hiking/climbing fan and I am also converted to one AND we wanted to have a piece of home country in our apartment, we decided to choose a mountain called Watzmann. Looks great, doesn’t it? It is a great mountain, an exhausting mountain. I’ve been to the peak! So here is a quick preview on how it looked in the end:
We also wanted to have a gallery wall with lots of photos, yet we didn’t want to buy picture frames for so many photos. But we wanted to have the look of frames. So we thought, why not hang those photos also with tape?!
Before we started with the more complex stuff we practiced on a smaller wall by creating some abstract shapes with black and golden tape.
Let’s start with the abstract shapes. Basically, we chose a smaller wall and randomly distributed triangles and quadrangles on the wall.
Abstract shapes
You need:
Black washi tape
Golden washi tape
cutter or scissors
Instructions:
I started simply with peeling the tape off the roll and attaching it on the wall. Cut it off with your scissors or cutter in the desired length. I let the ends overlap at first and trimmed them afterwards, so they end evenly.
Pictureframes
You need:
Photos
Washi tape
Cutter
double-sided adhesive tape
Instructions:
Think about how you roughly want to arrange the photos on the wall. Attach the Photos with the double-sided adhesive tape to the wall by using just a small piece of the adhesive tape. (You do this, so you can arrange the pictures first. It’s easier to frame them later with masking tape.) Then frame it with the washi tape in the desired color and shape of the frame, it’s up to you and your desire!
We did black and golden frames and sometimes cut off the corners of the frame for a more interesting shape. Have fun!
Mountain skyline
You need:
Black washi tape
Golden washi tape
Cutter
tracing paper or any other thin paper
pencil
ruler
measuring tape
Instructions:
First we looked for a photo of „Watzmann“ in wich you can see it from the perspective we wanted to have. And also one where the silhouette was clear. I traced the contour on my laptop screen (just use a thin paper, tracing paper would work best and place it on your screen and carefully trace the lines), so that you have the exact proportions.
We measured the wall, where we wanted to place the artwork. Then draw a centimeter (or use inch 😉 ) grid over the traced picture and calculate the proportional scaled measurements and write it down. Use the same grid on your wall, using the scaled measurements and mark a few points of the grid with tape. If you don’t want to do a motif of a particular mountain then you can skip the step with the grid. Sometimes a sketch of the picture is not a bad idea, though.
Then we started with the fun part – taping! Armed with the measuring tape, we measured from the marked grid points and checked the sketch regularly for how high the peaks had to be. We started with the rough contour. Later, we added some details and varied the thickness of tape, to get an overall smoother picture. The final touch was the summit cross, of course it is optional… But for me it’s mandatory!
Have fun with the DIY and if you create something yourself I would be happy if you show me! 🙂
Your little avocado,
Lisa
The Story of Fire and Ice – Traveling in Iceland

Urlaub zwischen Feuer und Eis – Reise nach Island
English version below!
Hallo ihr lieben,
ich habe bemerkt dass ich mir entweder Notizen machen sollte, oder einfach den Blogeintrag gleich schreiben sollte wenn die Eindrücke frisch sind. Es ist sowieso schon viel zu lange her, ich war dort Mitte September, haha. Aber lasst mich aus meinem Gedächtnis die 5 Tage in Island und meine Erfahrungen übers alleine Reisen rekonstruieren…
Tag 1 – Abschied in Deutschland & Ankunft in Island
Bis ca 3 Tage vor meiner Abreise war ich sehr entspannt und habe es gar nicht so überrissen dass es bald soweit ist. Als es dann immer näher rückte hab ich in immer kürzeren Abständen die Krise bekommen und gedacht ich bekomme nicht mehr alles geregelt. 2 Tage vor Abreise hat mir meine Schwester auch noch gesagt sie kann nicht mit nach Island kommen. Es war schon alles geplant und gebucht und das wäre noch ein toller Abschieds-Urlaub mit meiner Lieblingsschwester – ich habe nur eine – vor Kanada gewesen. Warum Sie nicht mitkommen konnte? Dazu mehr später… Am Tag der Abreise bin ich mit meiner Mama und meiner besten Freundin nach München gefahren, erst meine Schwester besuchen und danach zum Flughafen. Am Flughafen beim Abschied musste ich doch auch weinen, bin halt doch nah am Wasser gebaut… Goodbye Germany für mindestens 1 Jahr, schnief.
Iceland Air hat relativ günstige Flüge nach Edmonton und ist praktisch, weil man viel Gepäck mitnehmen kann (2 Gepäckstücke mit einem Gewicht von jeweils bis zu 23 kg!) und man kann bei Flügen von Europa nach Kanada und USA und umgekehrt einen kostenlosen Stopover in Reykjavik machen – und das bis zu 7 Tage. Kann ich also nur empfehlen! Am Flughafen Keflavik angekommen bin ich in den FlyBus gehüpft und vom Busterminal in Reykjavik in ein Taxi, da ich alleine meine zwei großen Koffer und das Handgepäck nicht durch halb Reykjavik schleppen wollte… Eigentlich war geplant den Stadtbus zur Unterkunft zu nehmen, aber da haben mir die zwei helfenden Hände meiner Schwester gefehlt.
Endlich in der Airbnb Unterkunft angekommen! Olof und Jon, die Vermieter des Zimmers waren super nett und haben mir mit meinen schweren Gepäck geholfen und das Zimmer war auch ausgesprochen günstig! Reykjavik an sich ist ja ziemlich teuer… Es war zwar nicht mitten im Zentrum aber ich bin oft auch zu Fuß 30-40 Minuten in die Stadt gelaufen, war ja Urlaub und ich hatte keinen Stress!
Tag 2 – Westisland Roadtrip mit einheimischen Privat-Guide
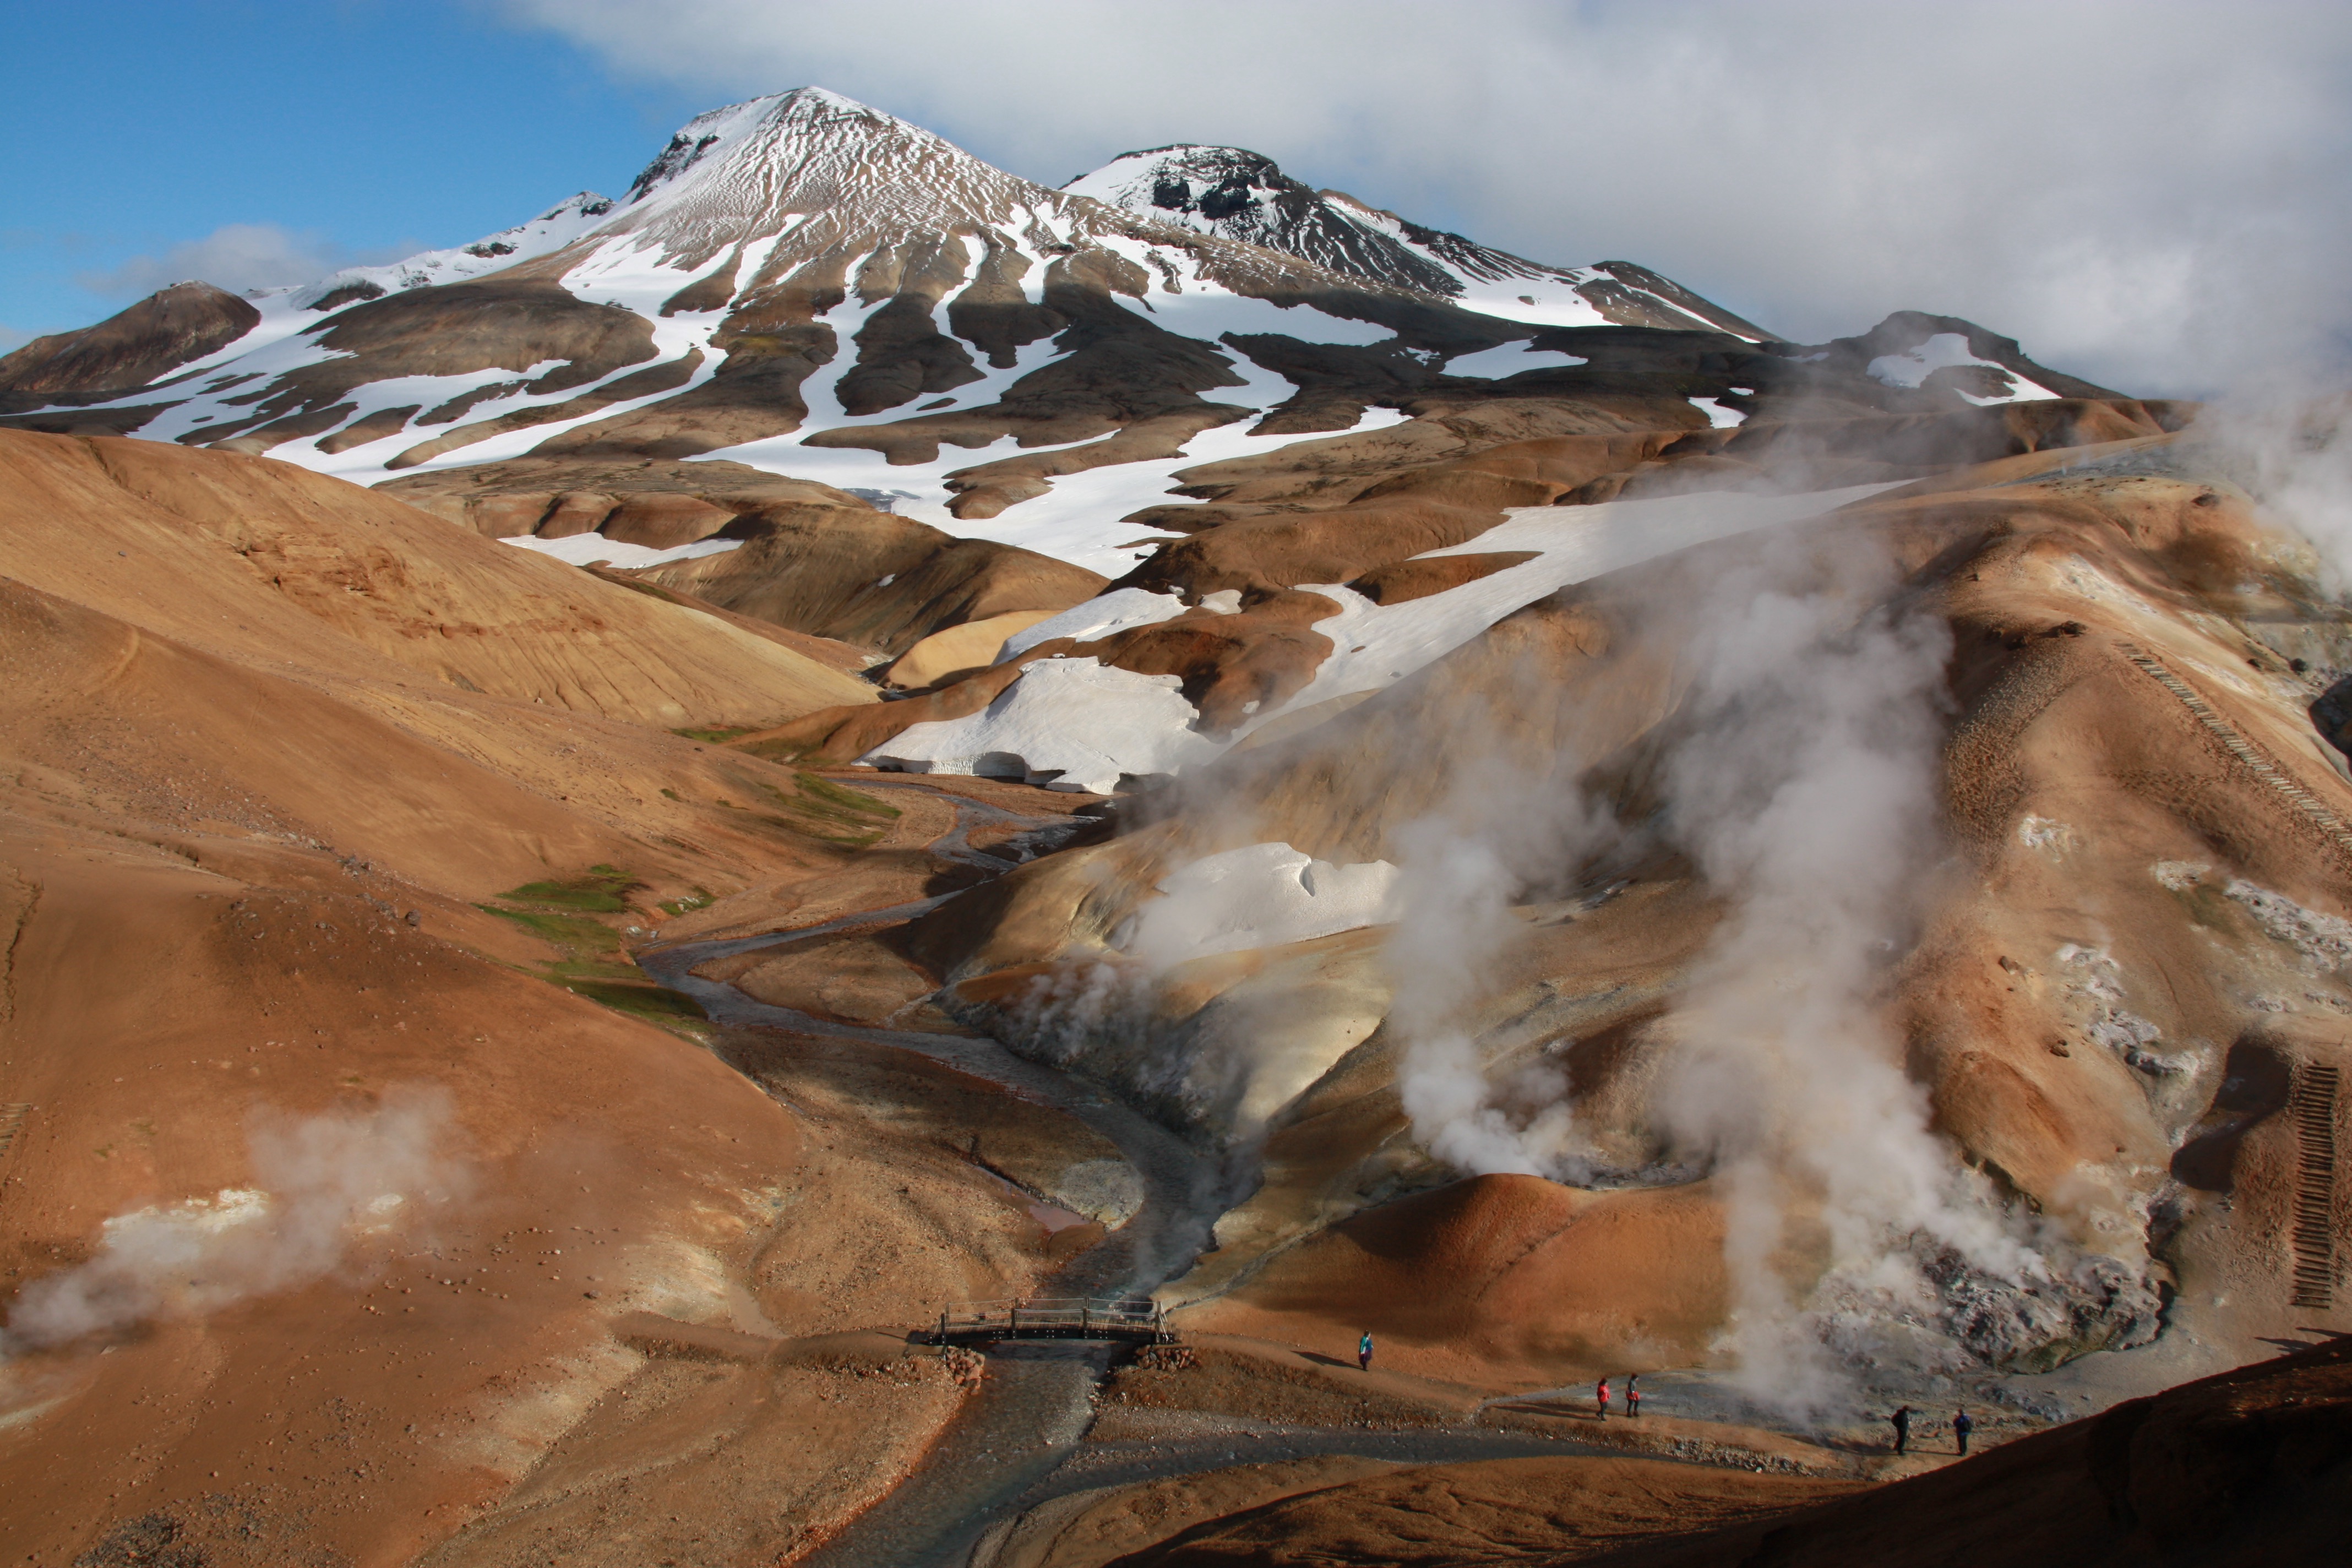
Noch in Deutschland habe ich über eine Carpooling Website eine Annonce gefunden von einem einheimischen Hobbyfotografen der einen Road-Trip in Westisland geplant hat. Er würde auch für uns bei den typischen Golden Circle (oder wie er es nannte: „Brown Circle“) Sehenswürdigkeiten halten und dann geht es weiter in den Norden zwischen zwei Gletscher durch in ein geothermales Gebiet und noch weiter Richtung Nord-Westen um bei Einbruch der Dunkelheit die Nordlichter zu sehen. Genau das was ich mir vorgestellt habe!
Ich wurde um 9 Uhr morgens abgeholt, noch dabei waren ein Australier und eine Litauerin. Unser erster Halt war in Þingvellir, wo geologisch betrachtet die Grenze zwischen Europa und Amerika verläuft. Hier in Thingvellir driften die Kontinentalplatten von Amerika und Eurasien im Durchschnitt ca. 2 cm im Jahr auseinander. Der Ort ist seit 1930 ein Nationalpark und wurde von der UNESCO als Weltkulturerbe aufgenommen.
Weiter ging es zum Geysir „Strokkur“ des „Brown Circles“. Übrigens: Brown Circle, weil bei diesen Sehenswürdigkeiten täglich so viele Touristen sind, dass diese einen braunen Trampelpfad hinterlassen. Und tatsächlich sind dort richtige Menschenmassen! Nichts desto trotz bin ich sehr froh, dass ich die Tour gleich mit dem Roadtrip abhaken konnte – muss man schon gesehen haben, ist sehr beeindruckend. Der Geysir brodelt so vor sich hin und alle 10 Minuten bricht er aus und es gibt eine bis zu 35 m hohe Fontäne, und das bis zu 3 mal hintereinander. Auch die dritte Sehenswürdigkeit, der Gullfoss Wasserfall war ziemlich beeindruckend aber es waren dort auch ziemlich viele Menschen, deswegen haben wir uns auch nicht sehr lange dort aufgehalten.
Damit hätten wir den Golden Circle abgehakt und es wurde erst so richtig spannend. Wir sind Richtung Norden weitergefahren einen kurzen Abstecher von der „richtigen“ Straße auf eine Kiesstraße die auf einem Kiesparkplatz geendet hat, was aber den Fahrer nicht gestört hat und wir sind einfach durchs Flussbett und ohne wirklichen Weg/Pfad/Straße durch die Landschaft geschaukelt. Als es sehr steil wurde und der Untergrund nicht unbedingt Fahrzeug-freundlich war meinte er ob es okay ist wenn er stehen bleibt und wir die letzten 20 m zu Fuß gehen. OH JA, BITTE DANKE! Die verrückte Autofahrt hat sich aber gelohnt, der milchige Gletschersee und der Wasserfall und die Sicht auf den Gletscher hat mich die Fahrt vergessen lassen!
Den gleichen weg zurück… Wir fuhren wieder auf der nicht vorhandenen Straße bis zum Kiesweg und dann auf die geteerte Straße, ein bisschen Froh war ich schon. Es war schon halb 4 Nachmittags und wir sind Richtung Kerlingarfjöll aufgebrochen. Ein geothermisches Gebiet. Dort angekommen haben wir das Auto geparkt und sind über Treppen und durch den schwefeligen Dampf weiter gegangen um einen unglaublichen Ausblick genießen zu können. Teils Rotbraune teils gelbliche Erde, grauer Schlamm, der teilweise etwas grünlich war, weiße Schneefelder und weißer Dampf und dazu blauer Himmel. Tolle Farben. Ich war im Foto-Himmel! Zurück im Auto sind wir noch weiter in den Norden, vorbei an weiteren Wasserfällen in einer atemberaubenden Landschaft. Es wurde schon langsam dunkel und wir sind an einer Tankstelle stehen geblieben um uns die Zeit zu vertreiben, Essen zu kaufen und natürlich um zu tanken. Ich habe das teuerste Essen meines Lebens an einer Tankstelle gekauft. Für einen mickrigen Wrap mit Kichererbsen und einen Müsliriegel habe ich umgerechnet ungefähr 21,– € gezahlt. Wie bitte?!
Endlich wurde es dunkel und der Aurora Forecast sagte uns dass wir heute mittelprächtig bis gute Chancen hätten Nordlichter zu sehen, das Wetter hat auch mitgespielt. Und tatsächlich! Wir haben welche gesehen. Svennin, unser Fahrer und Hobbyfotograf hat mir auch noch Nordlichter-Fototipps gegeben und ich hab auch ein paar ganz gute Bilder hinbekommen. Ca 20 Minuten hat das Spektakel gedauert, dann war es auch schon vorbei und wir sind weitergefahren um vielleicht noch wo anders die Nordlichter zu sehen. Leider war es auf dem weiteren Weg immer bewölkt und wir sind ohne Halt nach Reykjavik gefahren. Nichts desto trotz war es ein unglaublicher Tag und ich hab so viel gesehen und ich bin so froh dass ich das Inserat auf der Website gefunden hab. Glückstreffer!


Übrigens, für die, die es interessiert, die Tour auf Google Maps habe ich für euch hier.
Tag 3 – Whale Watching und Schwimmbad
Ich bin am Vortag ziemlich spät nach Hause gekommen, deshalb hab ich schön ausgeschlafen, gefrühstückt und bin erst am späten Nachmittag losgegangen Richtung Innenstadt und bin durch die Fußgängerzone bis zum Hafen runter gegangen, wo auch die Whale Watching Tour losging. Erfolgreich habe ich mein zweites Whale Watching Ticket an zwei Engländer verkauft, die sich über ein Schnäppchen gefreut haben (Online Booking war billiger) und ich mich darüber dass ich es losgebracht habe. Übrigens wollte meine Schwester unbedingt Wale sehen. Ich wäre lieber zu Blue Lagoon gefahren oder wäre auf den Berg gegangen oder sonst irgendetwas. Als wir losgefahren sind wusste ich auch nach ein paar Minuten warum ich nicht unbedingt Wale sehen muss. Mir war echt übel. Ich habe aber ein gutes Drittel der Fahrt durchgehalten und auch ein paar Delphine gesehen und dann bin ich unter Deck und habe versucht zu schlafen, damit die Fahrt schnell vorbei ist. Hat ganz gut geklappt. Also es is echt eine coole Tour, und wenn man Glück hat sieht man Wale, aber wenn man leicht Seekrank wird ist es nicht so lustig. Zurück an Land hab ich mir ein nettes Café gesucht. Laundromat Café, es gab auch ein paar vegane Sachen, ein veganes Sandwich, Suppe, etc. Habe das vegane Sandwich gegessen, war super Lecker und der grüne Tee war auch gut. Vor allem brauchte ich etwas Warmes nach der Bootsfahrt.
Auf dem Rückweg bzw. auf dem Weg ins Schwimmbad war ich noch ein bisschen bummeln und hab geschaut was es so gibt und habe ein paar Postkarten gekauft. Und zwar von einer Illustratorin die wirklich schöne, originelle und lustige Postkarten macht. Mal was anderes. Hier der Link zu den Postkarten, die gab es wirklich überall zu kaufen. Dann bin ich ein bisschen im Kreis gelaufen und habe das Schwimmbad gesucht, hat sich ganz schön versteckt. Und zwar in diesem hier: Laugardalslaug und war das ziemlich nah an meiner Unterkunft. Es gibt ganz viele dieser Thermen/Schwimmbäder in ganz Island und es is relativ günstig und es war ein guter Abschluss des Tages.


Tag 4 – Free Walking Tour & Auf eigene Faust Reykjavik erkunden
Am vierten Tag stand die kostenlose Walking Tour von Citywalk auf dem Programm. Die Tour war sehr lustig, der Guide Marteinn hat es sehr informativ aber auch wirklich lustig gestaltet. Zum Beispiel sind wir an der ansässigen Highschool vorbeigegangen und er hat uns deren Park-System erklärt. Weil der Parkplatz so klein ist parken sie sich gegenseitig ein weil sowieso alle zur selben Zeit nach Hause fahren. Falls es mal einen Notfall gibt haben und jemand früher weg muss haben alle Schüler einen Zettel hinter der Windschutzscheibe hinterlassen, mit Klassenzimmer und teilweise Telefonnummer, damit man die betroffenen Leute kontaktieren kann.
Ein anderes Beispiel ist z.b. die Ingolfur Arnarson Statue. Der haben Sie während der Gay Pride Parade einen pinkfarbenen Lippenstift verpasst. Wir durften auch Lakritze probieren und er hatte von isländischen Hausfrauen gestrickte Bierdosen Handschuhe dabei, die man auch kaufen konnte. Die Tour kann ich jedem ans Herz legen, man zahlt nichts oder nur so viel wie man möchte, in jeglicher Währung. Super Konzept! 🙂


Der letzte Tag war nur noch packen, zum Flughafen fahren und dort auf den Flieger warten. Worüber ich mich total gefreut habe, dass es am Flughafen in Keflavik einen Joe&the Juice gab. Da hab ich mir vor dem Abflug natürlich gleich einen Smoothie gegönnt. Grell Pink, mit roter Beete „Heart Beat“. SO LECKER! Ich liebe Joe&the Juice.
Alleine Reisen – Warum und wie es war
Meine Schwester hatte sich etwas über einen Monat vor unserem Urlaub ein Muttermal entfernen lassen, was an sich nichts schlimmes ist und so ein Eingriff dauert auch nicht lange. Normalerweise sollte das in einem Monat sogar schon soweit verheilt sein, dass man überhaupt nicht mehr eingeschränkt ist geschweige denn etwas davon merkt. Nicht in diesem Fall… Ich bin kein Arzt und kann es wahrscheinlich nicht beurteilen, aber eine andere Ärztin die die Fäden ziehen sollte und die Wunde nach ein paar Tagen angeschaut hat ist aus allen Wolken gefallen und meinte was die da gemacht hätten weil es überhaupt nicht geheilt ist und es sogar so schlimm war dass sie jetzt in regelmäßigen Abständen zum Hautarzt musste um zu überprüfen ob es anfängt zu heilen oder nicht. Lange Rede kurzer Sinn… Kurz vor unserem Urlaub haben die Ärzte dann beschlossen dass es nicht besser wird und dass sie in die Klinik muss, zur Beobachtung. Da war schon ca. ein Monat vergangen und die Wunde machte nicht mal irgendwelche Anstalten zu heilen. Zwei Tage vorher hab ich dann mit meiner Schwester telefoniert und sie meinte dass das nichts wird. Wir waren beide sehr traurig.
Ich hab für sie den Flug storniert, man bekommt ca. 50% vom Betrag zurückerstattet. Der Service von Icelandair war übrigens ausgesprochen freundlich. Das muss ich wirklich loben! Wir haben Sie am Tag meiner Abreise noch im Krankenhaus besucht und ich bin ohne Schwesterherz ein bisschen bedrückt nach Island geflogen. Ich war noch nie alleine im Urlaub, muss aber sagen, dass es auch seine Vorteile hat, weil man einfach tun und lassen kann was man will und wenn man keine Lust hat und heim gehen mag, geht man einfach heim. Wobei ich mich mit meiner Schwester so gut verstehe dass wir uns zu 99% einig sind bei den meisten Dingen, die wir tun wollen oder nicht. Ich habe einfach das beste daraus gemacht.
Bis bald, mit einem DIY-Projekt, meine ersten paar Wochen in Edmonton oder einem Rezept… wer weiß was kommt 😉
eure kleine Avocado,
Lisa
English version:
Between Fire and Ice – Traveling in Iceland
Hey Guys,
I know now that I should take notes or write the blog article right away when the impressions are fresh. It took me to long anyways. I was there mid September, haha. But let me reconstruct my thoughts of the 5 days in Iceland and my expericence with traveling alone…
Day 1 – Goodbye Germany & Arriving in Iceland
I was so relaxed until 3 days before my departure (I am leaving Germany for at least a year!) and it took my that long to realize that the day is right around the corner. As the day was getting nearer I lost it – many times and I though I will never get everything done until then. 2 Days before my departure my sister told me that she couldn’t come to Iceland with me. Everything was planned out and booked and this would have been our awesome „Goodbye Trip“ before Canada, together with my favorite sister (I only have one). Why? More to this later… On the departure day my mum, my best friend and me drove to Munich, first to visit my sis and then to the airport. Finally I had to say Goodbye at least for one year and there were a few tears, really emotional… sniff
Iceland Air has comparative low priced flights to Edmonton and is really convenient, because on intercontinental flights you can take a lot of baggage with you (2 bags weighing up to 23kg (50lbs) each) and you can make a stopover in Reykjavik on a flight from Europe to Canada/USA and the other way around – up to 7 days! Sounds great right?
So I arrived at the Airport in Keflavik and hopped on the FlyBus to the bus terminal in Reykjavik, from there in a taxi, because I didn’t want to carry my two big bags and hand luggage through the whole city. The original plan was to take the city bus to the place we are staying but for that the two helping hands from my sister were missing.
Eventually I arrived at the house of the airbnb hosts! Olof and Jon, the hosts were really friendly and helped my with my heavy bags and the room was also a real bargain. Reykjavik is in princible a really pricy city… Anyways… the room was not in the city center. I took my 30-40 minutes by foot, but this didn’t bother me, because I had time, I am on vacation, right?
Day 2 – Western Iceland road trip with a native private guide
Back in Germany I found a post on a carpooling website from a iclandic hobby photographer who planned a road trip on the west part of Iceland. He would also stop for the typical golden circle (Or how he said it „brown circle“) sights. After that we would head north past two glaciers to a geothermal area and then further north-west so that we can see the northern lights when it’s getting dark. That was what I imagined, this was what I want to do!
He picked me up at 9 a.m. and with him were already a Australian guy and a girl from Lithuania. Our first stop was Þingvellir, where Iceland is divided in a European part and an American part, at least through the eyes of a geologist. Here in Thingvellir the tectonic plates of America and Eurasia are drifting approximately 2 cm apart each year. The Place is a national park since 1930 and UNESCO listed it as World Heritage Site.
We drove to our next stop on the „brown circle“ the Geysir „Strokkur“. btw: brown circle, because there are so many tourists visiting the sights each day they leave a brown dirt trail behind. And really, the places are crowded. Nevertheless, I am so glad that I visited these sights with this private trip and not as a full touristy day trip. You have to see it, for sure, but you don’t have to spend a whole day there. The Geysir is bubbling away and every 10 minutes it erupts in a 35m fountain and that up to 3 times in a row.
Also the third sight, the Gullfoss waterfall, was really impressive as well. It was crowded as well but we didn’t spend much time there anyways.
So that was it for the Golden Circle and I had the feeling that the tour really got started. We headed north and made a little detour. Away from the „proper“ street and further on a dirt road wich ended in a parking area. The driver didn’t get worried by that fact and we drove on an non-existing bumpy trail through the landscape. As it got really steep and the ground was not meant to drive with a vehicle on it he asked us if it is okay if he stopped here and go the last 20 m by foot. OH YES PLEASE! Although, the crazy ride was worth it. The milky glacier lake, a waterfall in the front and the sight on the glacier in the back let my forget the bumpy ride.
But of course we had to take the same way back… We drove again on the non-existend trails to the dirt road and back on the tarred road. It was 3:30 p.m. on this point and we headed towards Kerlingarfjöll, a geothermal area. We parked the car hiked a path with many stairs through the sulfurous steam to enjoy a spectacular view. Partly Terra cotta colored earth partly yellow, grey mud, which was sometimes also greenish, white snowfields and white steam and if that wasn’t enough – blue sky. Amazing colors. I was in photography heaven! Back at the car we drove further north trough a breathtaking landscape. We stopped at a gas station to kill time, buy food and of course to fill the car with gas. For a teeny-tiny wrap with chickpeas and a granola bar i payed about $30. Like… Whaaat?
Finally it got dark and the Aurora Forecast said there was a fair to good chance to see northern lights today. The weather cooperated too. An for real! We saw the northern lights. Svennin our driver, guide and hobby photographer gave me some advice how to capture it with my camera, and I managed to take some really good ones. It lasted approximately 20 minutes and then it was over. We drove further west but we didn’t saw more of the northern lights. Additionally the weather was mostly cloudy in the western part. So we didn’t stop again and drove right to Reykjavik. Nontheless, it was a incredible day and I saw so much in just one day and I am really glad I found the post on the website. Lucky strike!
If you are interested, you can see the full tour on google maps here.
Day 3 – Whale watching and swimming pools
Because it was really late yesterday when I came home, I slept in and had a late breakfast and started walking to the city center in the afternoon. I went through the pedestrian area to the harbor, where the Whale Watching Tour started. Luckily I managed to sell my second ticket to a British couple. They were happy because the made a bargain (online booking was cheaper) and I was happy that I got rid of it. And for the record my sister was the one who wanted to see the whales. I’d rather go to the Blue Lagoon or go hiking or something else. As the ship laid off I realized after a few minutes why I don’t necessarily have to see whales. I got really sick. I managed to stay strong for a third of the tour. I took some photos of dolphins. But then I went below and tried to sleep, so that the tour will be over fast. It worked. It was really nice and if you are lucky you see some whales but if you like me and get see sick really easily maybe your better of with something else. Back on land I found a nice little Café. Laundromat Café, they had also some vegan stuff. A vegan sandwich, soup, and so on. I had the vegan sandwich with some green tea. It was really good. I needed something warm and comforting after the tour on the boat.
On my way back, or better on my way to the swimming pool I went shopping and bought some post cards. And they had amazing cards from an illustrator and she makes really creative and funny things. Different. Check it out here. You can buy them nearly everywhere in Reykjavik. Then I got lost on my way to the pool but eventually I found it. Laugardalslaug was the one I went to and it was really close to the airbnb accommodation. There are a lot of swimming pools like this all over Iceland and they are quite cheap and for me it was a nice ending to the day.
Day 4 – Free Walking Tour & Exploring Reykjavik on my own
On the fourth day I planned on doing a free walking tour (Citywalk). The tour was really funny and the guide Marteinn did a good job mixing the informativ part with a lot of humor. For example we went to the local high school and he showed us their parking system. The parking lot is really small so they park really close to each car and so a car in the back has to wait until all the cars are gone to drive out of the parking lot. But because everyone leaves the school at the same time this is not a problem. But if there is a emergency they leave a note with the class room and sometimes a phone number. Now, when somebody has to leave early he can contact the affected car owners.
Another example is the Ingolfur Arnarson statue. During the gay pride parade they colored his lips pink. He also gave us little licorice samples and he had a great inventions, a beer glove, knitted by Icelandic women, with him to sell them. If you go to Reykjavik you should really do this tour. You pay nothing, but you can donate (recommended!) if you want in any currency you want. Great Concept! 🙂
The last day was only packing up, going to the airport and waiting for my flight. But one thing I was really happy about. There was a Joe&the Juice at the Keflavik airport! Of course I enjoyed a smoothie before I left. It was bright pink, with red beet called „Heart Beat“. SO DELICIOUS! I love Joe&the Juice.
Traveling alone – Why and my experience
My sister got a birthmark removed over one month before the trip to Iceland. It’s not a big deal and it doesn’t take very long. And normally it should heal within a couple weeks so that you are not limited in any way. But not in this case… I am not a doctor and I cannot judge in this way, but the other doctor who removed the stitches a few days later was speechless and asked what the other doctor did there because it didn’t heal at all. And it was really bad and she had to visit the doctor now regularly every couple of days to let the doctors check on the wound and if it starts to heal. To cut the long story short. Not far from the departure date the doctors decided to put my sister in a clinic for medical observation. The wound was still there, and this after a month. Two days before departure I phoned with my sister and she told me she has to stay in Germany. We were both really sad.
I canceled her flight for her. Iceland Air was really nice and helpful on the phone and the gave here 50% back from the original price. Not too bad. I really have to say it was a good service. On the day of my departure we visited her in the hospital. I flew without my dear sister a little depressed to Iceland. I was never on vacation alone but I must say that it has its perks because you can do whatever you like to do. On the other hand I get along with my sister really well and we agree in 99% of the things we want or don’t want to do. But I made the best of it.
So guys, see you soon, maybe with a DIY-project, the first few weeks in Edmonton or with a recipe. Who knows whats next… 😉
Your little Avocado,
Lisa
30 Days Vegan Challenge
English version below
30 Tage vegan und zuckerfrei essen
Hallo ihr Lieben,
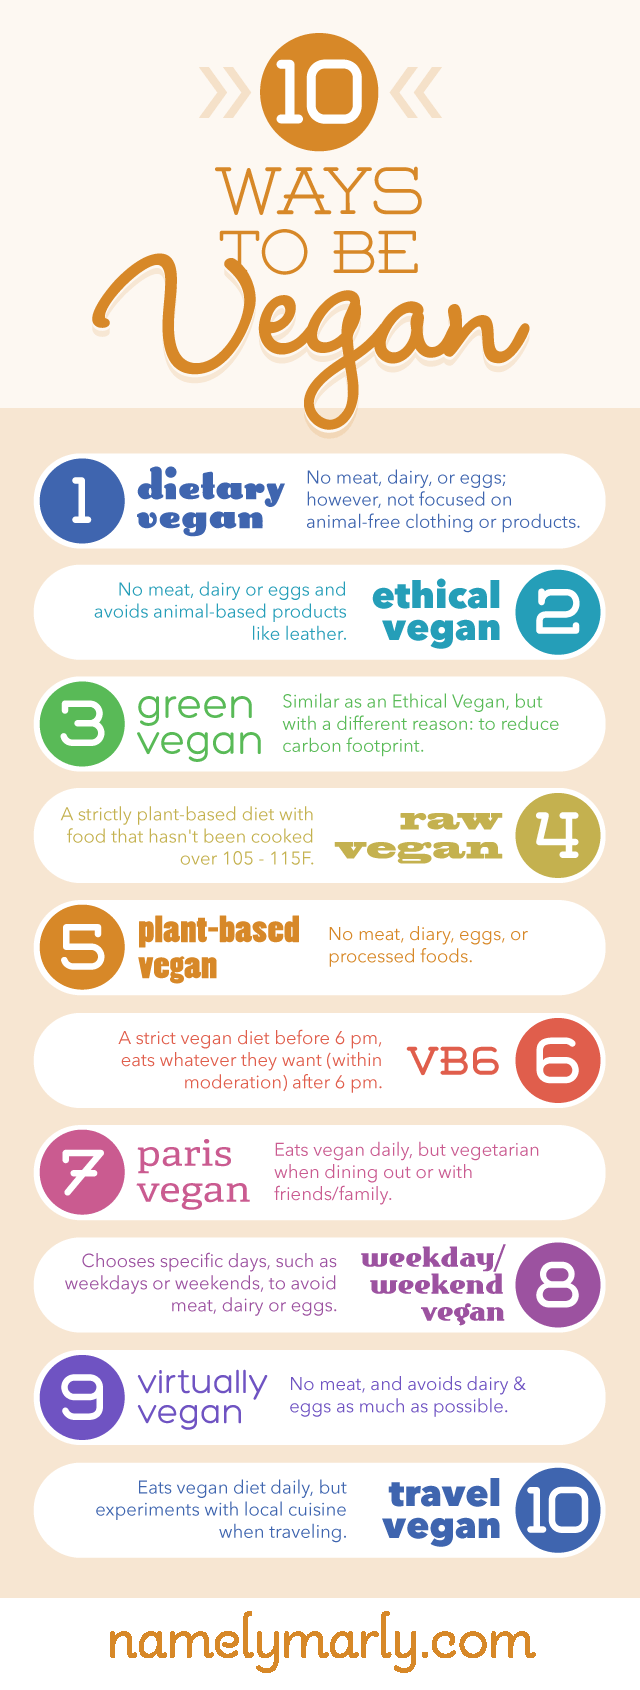
eine 30 Tage Challenge – schon wieder! Das 3. Mal mach ich diese Challenge nun und ich ernähre mich sowieso hauptsächlich vegan, außer wenn es nichts anderes gibt, oder jemand extra kocht und ich keine „Umstände bereiten will“. Ich habe einen tollen Blogeintrag gelesen und gelernt dass ich ein „Paris Vegan“ bin, wenn es nichts veganes gibt dann ess ich eben etwas vegetarisches, kein Drama, locker, alles gut. Ich finde hier gibt es kein „Ganz oder gar nicht“, ich finde auch kleine Änderungen können große Auswirkungen haben! (In welche Kategorie fällst du? Lass mir einen Kommentar da!)
Ich schweife ab! Auf alle Fälle… wollte meine Mama die vegane Challenge mit mir machen, deswegen hab ich natürlich gleich einen Wochenplan erstellt, bin in alle möglichen Läden gelaufen um alle Zutaten zu kaufen, war super motiviert mit meiner Mama die Challenge durchzuziehen und es ihr so leicht wie möglich zu machen. Hat auch super funktioniert. Meine Mama ist jetzt schon ein wenig „angefixt“ und beschäftigt sich mit dem Thema. Juhu!
Ich finde die Challenge einen super Einstieg, sich (gesund) vegan zu Ernähren, weil in dem Buch, neben den ganzen Rezepten, viele Tipps und Infos über das Thema vegan geschrieben stehen. Ausprobieren kann ich nur empfehlen!
Meine Erfahrungen
Ich mache die Vegan For Fit Challenge von Attila Hildmann nun schon wie gesagt zum dritten Mal. Ja ich weiß viele finden ihn doof und ich versteh auch manchmal nicht was er mit manchen Posts auf Facebook bezwecken will oder einfach nur pöbeln will. Was ich aber auch nicht versteh warum ihn alle in der Luft zerfetzen, egal was er schreibt oder sagt oder postet. Er macht leckere vegane Rezepte die er auch nicht-veganern näher bringt. Dadurch ist die Nachfrage nach veganen Produkten und Restaurants in Deutschland ziemlich angestiegen (sicher nicht nur durch ihn), was ich richtig gut finde. Warum muss man sich dann so beschweren? Ich mag dieses Macho-Porsche-Pumpen-Gehabe auch nicht, aber ich finde seine Bücher gut und die Challenge hat mir geholfen, insgesamt 10 kg abzunehmen und zu halten. … Sorry, musste ich mal loswerden. Ich hoffe ihr wisst was ich damit sagen will. Zusammengefasst: Buch gut, Challenge gut, Attila – bildet euch eure eigene Meinung, Pöbeln blöd. Ach und noch ein guter Punkt, Attila hat das Thema vegan in Deutschland ziemlich vorangetrieben… Wie auch immer, zurück zur Challenge: Ich bin super damit klar gekommen, hab viel abgenommen (jeweils ca. 5 Kilo), hatte keine Beschwerden, war immer satt, hab nie etwas vermisst in der Zeit. Vorallem aber hat mir (fast) alles richtig, richtig gut geschmeckt.
So, nun zu den Challenge-„Auflagen“:
- Im Buch gibt es Rezepte für das Frühstück, Mittag-/Abendessen, Snacks und Belohnungen wenn man Sport gemacht hat. Außerdem sind die Rezepte unterteilt in Gerichte, die man immer essen darf oder Gerichte, mit vielen Kohlenhydraten, die man nur vor 16 Uhr essen sollte.
- Man isst keine „leeren“ Kohlenhydrate wie weißes Mehl, Nudeln, etc., keinen Industriezucker und natürlich keinerlei tierische Produkte. Am besten nimmt man nur natürliche Produkte, ohne Konservierungsstoffe und sonstige Zusätze zu sich.
Es ist keine low-carb Diät, man isst lediglich abends nicht so viele Kohlenhydrate. - Man sollte sich auch ab und zu mal Bewegen, Sport ist wichtig, vor allem wenn man die Challenge nutzen möchte um abzunehmen.
Die erste Woche
Dienstag, Tag 1:
Frühstück: Amaranth-Joghurt-Pop (Seite 55)
Mittags: Moussaka reloaded mit Tofu-Hack (doppelte Menge von der Soße machen!) (Seite 80)
Abends: restliches Tofu-Hack mit 1/2 Dose Tomaten, dazu Zucchini Spaghetti
Snack: Best-Riegel-In-The-World
Mittwoch, Tag 2:
Frühstück: Cranberry-Kokos-Ananas-Müsli (Seite 57)
Mittags: Einkorn-Vollkorn-Nudeln, Basilikum-Limetten-Pesto (Seite 126)
Abends: Kürbis-Paprika-Gemüse mit Kokos-Tofu (Seite 112)
Donnerstag, Tag 3:
Frühstück: Amaranth-Pancakes (Seite 52) ohne Himbeereis, dafür mit Banane+Nussmus
Mittags: Spataner-Hirse (Seite 90) die einfache Menge wird sehr viel, Rest kann morgen Mittag gegessen werden
Abends: Großer Salat mit Tomaten, Karotten, Gurke und angeröstetem Tofu und einem Dressing aus dem Pesto von gestern und Balsamico
Drink: Vegan-For-Youth-Juice (aus dem VFY-Buch)
Freitag, Tag 4:
Frühstück: Challenger Frühstück (Seite 58)
Mittags: Rest der Spataner-Hirse
Abends: Backofen-Gemüse (Seite 116) mit 2 Dips (von den Kürbispommes-Rezept auf Seite 93)
Samstag, Tag 5:
Frühstück: Vollkornbrot mit Aufstrich
Mittags: Gemischter Salat mit Hirse // Vollkornbrot mit Nussmus und Banane
Ich bin an diesem Tag sportlich sehr aktiv (6+ Stunden) und nicht Zuhause, deshalb weiß ich noch nicht was ich mitnehme. Vorschläge?
Abends: Zucchini-Bandnudeln mit Paprika-Walnuss-Soße (Seite 146)
Snack: Best-Riegel-In-The-World
Evtl. eine Belohnung aus dem Buch oder wenn man nichts aus dem Buch machen möchte, eignet sich auch die Love Choc Schokolade! 🙂
Sonntag, Tag 6:
An diesem Tag ist meine Mama unterwegs, ich werde ihr ein Fress-Paket machen 😉
Frühstück für mich: Fast-Life-Sandwich (Seite 67)
Frühstück To Go für meine Mama: Ein Overnight-Oatmeal (genaueres folgt)
Mittags für mich: Gemüse-Curry mit Qunioa
Mittags für meine Mama: Isst auswärts im Restaurant. Ich werde euch berichten was sie gegessen hat.
Abends für mich: ein großer Salat mit Bohnen (genaueres folgt)
Abends: Salat To Go in a Jar (genaueres folgt)
Montag, Tag 7:
Frühstück: Fast-Life-Sandwich (Seite 67)
Mittags: Gemüse-Curry mit Qunioa
Abends: Rohkost, mit Hummus
Bis bald,
eure kleine Avocado – Lisa
English version
30 days vegan and refined sugar free
a 30 day challenge – again! For the 3rd time I am doing this vegan Challenge for a month. My diet is mostly vegan anyways. With exceptions i must say: When I am eating out or have dinner at a friends house and there isn’t anything vegan there I just eat vegetarian. Today I read in a blog about different types of vegans and learnt that I am a „Paris Vegan“. When there is no vegan food, everything is fine, no drama, I eat vegetarian. I find there is no „all or nothing“ here. I think also small changes in your diet can effect a lot! (What kind of vegan are you? Leave me a comment!)
Back to the topic! Either way, my mum wanted to do the vegan Challenge with me. So I ended up making a weekly meal plan, ran from supermarket to health food store to get all the ingredients and was super happy and motivated! My mum really liked all the vegan food and felt great after the 30 days and now she is a little bit „infected“ with the idea. Yay! 😉
The challenge is a good introduction to a (healthy) vegan diet because there are also advices and infos about veganism in the book in addition to all the awesome recipes. I think there is also a english version available now! 🙂
My experience
As I said before, I did Attila Hildmann’s Vegan For Fit Challenge three times already. I know a lot of vegans don’t like him, and I don’t always agree with what he says. But other than that, the book as well as the challenge concept is amazing. I lost about 10 kg and didn’t gain any of my weight back. I didn’t have any problems, was satisfied and missed nothing. But most important, (nearly) every recipe I tried tasted great.
The rules:
- The book has recipes for breakfast, lunch/dinner, snacks and treats if you did some kind of workout. It’s separated into two different kinds of recipes: Some of the dishes you can eat any time of the day, other dishes you should eat before 4 p.m..
- You can eat all plant based and whole, natural foods. The only exception are refined “white” flour etc. and refined sugar. In general the less processed the better!
It’s not a low carb diet. You just eat nearly no carbs in the evening. - You should be very active. Workout is important. Especially, if you want to loose weight with this challenge.
Mealplan, Week 1:
Tuesday, Day 1:
Breakfast: Popped amaranth with yogurt and fruit
Lunch: Sweet potato and eggplant moussaka with minced tofu double the amout of the sauce for dinner!
Dinner: Zucchetti (zucchini spaghetti) with the sauce from lunch + half a can tomatoes
Snack: Granola bar (no sugar)
Wednesday, Day 2:
Breakfast: Cranberry coconut pineapple muesli
Lunch: Wholewheat pasta with basil lime pesto
Dinner: Curried pumpkin and bell pepper with coconut tofu sticks
Thursday, Day 3:
Breakfast: Amaranth pancakes with nut butter and a banana
Lunch: Millet with mediterranean vegetables, double the amount so you can eat it the next day
Dinner: Big salad with tomatoes, carrot, cucumber, roasted tofu and a dressing made of the pesto and balsamic vinegar
Drink: Apple carrot orange pumpkin juice
Friday, Day 4:
Breakfast: Sweetpotato with scrambled tofu
Lunch: The rest of the millet from yesterday
Dinner: Baked vegetables with 2 different dips
Saturday, Day 5:
Breakfast: Wholegrain bread with vegetable spread
Lunch: salad with millet // wholegrain bread with nut butter and banana
I’ll be hiking on saturday, so I won’t be at home and I don’t know what I should take with me yet. Any suggestions?
Dinner: Zucchini noodles with bell pepper walnut sauce
Snack: Granola bar
Treat: Maybe a sugarfee chocolate, or something else.
Sunday, Day 6:
Today my mom is not at home and I will make her breakfast and dinner in a jar.
Breakfast for me: Fast-Life-Sandwich
Breakfast for my mum: Overnight-Oatmeal (more information soon)
Lunch for me: Vegetable curry with quinoa
Lunch for my mum: She will be eating out. I’ll tell you what she ate
Dinner für mich: A big salad with beans (more information soon)
Dinner: Salad in a jar (more information soon)
Monday, Day 7:
Breakfast: Fast-Life-Sandwich (Seite 67)
Lunch: Vegetable curry with quinoa
Dinner: Raw veggies, with hummus
The next week will follow soon…
See you soon!
Your little Avocado,
Lisa
Mango Salsa – Rezept – Recipe

English version below!
Perfekt für die Grillsaison
Hallo ihr lieben,
ich möchte heute ein Rezept mit euch teilen, das ich wahnsinnig gern mag und nun schon öfter gemacht habe, und das auch immer gut ankam. Es passt sowohl zu gegrilltem Gemüse, Fisch oder auch zu Fleisch und natürlich auch zu Tortilla Chips, was meine Lieblings-Knabberei ist!
Gestern war ich zum Grillen eingeladen und habe diese Salsa mitgebracht und prompt Komplimente eingeheimst! Außerdem macht die fruchtige Salsa Instant-Gute-Laune, auch bei totalem Mistwetter wie heute – Regen, Regen, nichts als Regen. Ein bisschen (oder auch sehr, je nachdem wie viel Chili man benutzt) scharf, fruchtig-süß von der Mango und ein Frische-Kick von Limette und Koriander – perfekt!

Rezept
Du brauchst:
- 1 reife Mango
- 5 – 6 Strauchtomaten
- 1 rote Zwiebel
- 1 Zehe Knoblauch
- 1/2 – 1 Chilishote
- einen halben Bund Koriander
- den Saft einer Limette
- einen Schuss Olivenöl
- 1 Tl Agavendicksaft
- Salz & Pfeffer nach Geschmack
So geht’s:
Zwiebel und Knoblauch schälen fein hacken, Chili entweder sehr fein schneiden oder in einem elektrischen oder handbetriebenen Universalzerkleinerer fein häckseln. Dann die Mango schälen und das Fruchtfleisch vom Kern schneiden und in kleine Würfel schneiden, Tomaten waschen und fein würfeln und Koriander grob hacken. Alternativ könnt ihr die Mango, Tomaten und Koriander auch grob schneiden und auch mit dem Zerkleinerer verarbeiten, so erhaltet ihr eine gleichmäßigere Konsistenz, die sich besser zum Dippen eignet, wenn ihr es aber gerne „chunky“ mögt ist das normale Messer die bessere Variante.
Alles in einer Schüssel mischen, Limettensaft, Olivenöl, Agavendicksaft hinzufügen und mit Salz und Pfeffer nach Geschmack würzen.
Entweder sofort servieren oder in einem luftdichten Behälter oder Schraubglas aufbewahren. Im Kühlschrank hält sich das ganze ein paar Tage.
Varianten:
Funktioniert auch mit einer halben Ananas anstatt einer Mango super!
Viel Spaß in der Küche wünscht euch
eure kleine Avocado,
Lisa

English version:
Perfect for the BBQ Season
Hey guys!
I want to share a recipe with you. I love it and I made it several times by now and everybody liked it. You can eat it with grilled vegetables, fish or with meat if you like. You can also dip your tortilla chips into the salsa – my favorite snack!
Yesterday I was invited to a BBQ party and brought this salsa. I received a lot of compliments for this recipe. The mango salsa is an instant mood brightener! You eat this salsa and feel better instantly even with this rainy weather today in south Germany. At first you taste the sweetness of the mango, the spicy chili and finally the freshness from the lime and cilantro cuts through – yum!
Recipe
You need:
- 1 ripe mango
- 5 – 6 tomatoes
- 1 red onion
- 1 glove garlic
- 1/2 – 1 chili
- half a bunch fresh cilantro
- juice of a lime
- a drizzle of olive oil
- 1 tsp agave syrup
- salt & pepper to taste
Instructions:
Peel and dice the onion and garlic finely. Chop the chili also in small pieces. Leave out the seeds if you don‘t like it that hot. Peel the mango and cut along the stone. Dice it into small pieces. Wash the tomatoes and dice them finely. Chop the cilantro. If you don’t want to cut everything with a knife and want a smoother consistency throw the ingredients into a food processor and process until you have the desired consistency.
Mix everything in a bowl with the lime juice, olive oil and agave syrup. Season with salt and pepper to taste.
You can serve it instantly or you can store it in an air-tight container or mason jar a few days in your fridge.
Alternatives:
You can experiment with the fruits and swap the mango with half a pineapple if you like.
Have fun in the kitchen!
Your little avocado,
Lisa
Liebe Avocado-Liebhaber, Freunde des gesunden und leckeren Essens, Reise-Begeisterte und DIY-Mutige
dies ist mein 1. Blogeintrag, das Design ist noch nicht da, es gibt noch keine „richtigen“ Blogeinträge, aber ich wollte euch schon mal mitteilen, was euch hier erwartet.
Ich liebe Essen, eine sehr große Rolle wird hier Essen, Rezepte, Restaurant-Tipps und meine Essens-Entdeckungen in Kanada spielen, was mich gleich zu meinem nächsten Punkt bringt. Ich stecke mich selbst nicht gern in Schubladen, aber wenn ich meine Ernährungsweise beschreiben muss sag ich immer ich bin ein Pesci-Vegetarier. Ich esse Fisch, Eier und auch ab und zu Milchprodukte (aber nur mit Lactase-Tabletten, da ich laktoseintolerant bin). Phasenweise ernähre ich mich auch ausschließlich pflanzlich, verzichte auf industriellen Zucker und stark verarbeitete Lebensmittel.
Sicher werde ich euch etwas von meinen „Abenteuern“ in Kanada erzählen … MÜSSEN. Ich bin ab September (vorerst) ein Jahr in Kanada und werde euch bestimmt etwas von meinen Reisen, Arbeit, Menschen, Kultur oder sonst etwas auf die Nase binden.
Außerdem habe ich beschlossen dort in meiner neuen Wohnung ein paar DIY-Projekte zu starten, wo ich mich auch schon fleißig auf Pinterest inspirieren lasse. Genaueres kann und will ich nicht verraten, da ich dann wahrscheinlich eh nur halb so viel mache wie ich mir vorgenommen habe 😉
So wie es aussieht hab ich ziemlich viel vor, es ändert sich auch für mich in nächster Zeit einiges. Vielleicht kann ich euch gerade deshalb ein paar spannende Dinge erzählen, leckere neue Rezepte mitgeben und zusammen mit euch DIY-Projekte starten.
Bis bald und lasst mir gern ein paar Zeilen da!
Eure kleine Avocado Lisa